F5 BIG-IP
F5's BIG-IP is a family of products covering software and hardware designed around application availability, access control, and security solutions.
- Design
- F5 Container Ingress Service
- F5 APM Microsoft Exchange 2016
- F5 APM SSO Infos
- Tuning the OneConnect Profile
- Kerberos Delegation & Protocol Transition
- BigIP DNS (Formerly GTM)
- Operation
- The Big-IP can be configured to use either tmm or mgmt interfaces for remote authentication (LDAP, TACACS, RADIUS, etc.) traffic.
- Useful CLI commands F5
- F5 fix Guided Configuration Installation
- Flow Traffic TCP
- Flow iRule Diagram (Event order)
- Upgrade an Active-Standby Cluster
- Preserving client IP address in any TCP session
- Useful F5 Log Queries
- Clearing the LCD and the Alarm LED remotely
- APM: Variable Assign
- F5 LTM TMSH Base Config
- ASM Operation Manual
- F5 iControlREST
- F5 SNMP useful OIDs to monitor
- F5 Programming
- ASM Deployment
- F5 REST-API (iControlREST)
- F5 LTM Config Merge Procedure
- Troubleshooting
- F5 APM: Convert attribute values
- VPN Client Troubleshooting
- F5 Big-IP Advanced Troubleshooting
- Send Logfiles to F5 Support and compress them
- Links & Tools
Design
F5 Container Ingress Service
Installation
Installation über Helm Chart mit Beispiel values.yaml
https://clouddocs.f5.com/containers/latest/userguide/cis-installation.html
Manual Installation
https://clouddocs.f5.com/containers/latest/userguide/kubernetes/
Deployment Options
Via NodePort oder ClusterIP
https://clouddocs.f5.com/containers/latest/userguide/config-options.html
NodePort
Similar to Docker, BIG-IP communicates with an ephemeral port, but in this case the kube-proxy keeps track of the backend Pod (container). This works well, but the downside is that you have an additional layer of load balancing with the kube-proxy.

ClusterIP
The BIG-IP CIS also supports a cluster mode where Ingress traffic bypasses the Kube-proxy and routes traffic directly to the pod. This requires that the BIG-IP have the ability to route to the pod. This could be by using an overlay network that F5 supports (Flannel VXLAN, or OpenShift VXLAN). Leave the kube-proxy intact (no changes to underlying Kubernetes infrastructure).

F5 APM Microsoft Exchange 2016
Microsoft Exchange specific config options for integration with F5 APM
OWA 2010
Integrate Microsoft OWA and APM seems to be easy but the devil has to be found in the details.
Example: The customer want to give the options like the light version or public- or private-computer to the users like here in OWA 2010:

When you log in, OWA offers the following options:
- This is a public or shared computer: Allows you to be logged in for 1 hour before you are automatically logged out.
- This is a private computer: Allows you to be logged in for 24 hours you are automatically logged out.
- Use the light version of Outlook Web App: Removes some of the features of OWA.
This settings are described here: https://docs.microsoft.com/en-us/powershell/module/exchange/client-access-servers/set-owavirtualdirectory
OWA 2016
In OWA 2016 the logon screen look like the following:

Config Options
Change the OWA logon options with the following settings:
Set-OwaVirtualDirectory -LogonPageLightSelectionEnabled <$true | $false>
Set-OwaVirtualDirectory -LogonPagePublicPrivateSelectionEnabled <$true | $false>
Direct URL for using the different OWA modes
Documentation
Using Outlook Web App Web Parts
How to compose a New Message or Event and Populate fields in OWA
Layout Mode
Type one of the following parameters behind the /owa/ part to change the layout.
| ?layout=tnarrow | Single column layout optimized for small screens or when holding the tablet in portrait mode. This is the standard for recognized and supported smartphones. |
| ?layout=twide | Multi column layout optimized for larger touch screens or when holding the tablet in landscape mode. This is the standard for recognized and supported tablets. |
| ?layout=tmouse | Default layout optimized for mouse usage. This is the standard on normal desktops and devices with a supported browser. When the browser isn’t supported, OWA Light will be loaded instead. |
| ?layout=light | Light Layout for low bandwidth usage |
Links
https://blogs.technet.microsoft.com/ptsblog/2013/10/21/url-for-office-365-outlook-web-app-light/
https://hochwald.net/enable-adfs-authentication-on-exchange-2016/
https://hochwald.net/adfs-authentication-with-exchange-troubleshooting/
https://asichel.de/2017/06/14/adfs-4-0-mit-exchange-2016-konfigurationsuebersicht/
https://proofid.com/blog/single-sign-on-to-outlook-web-access-using-pingfederate/
https://www.citrix.com/blogs/2014/03/31/owa-2010-login-options-on-aaa-login/
https://serverfault.com/questions/162433/single-signon-options-for-exchange-2010
F5 APM SSO Infos
NTLM and APM
- Microsoft Pass-Through Authentication
- Configuring APM client side NTLM Authentication
- F5 APM NTLM, Basic and SAML Seamless
- Use NTLM to bypass f5 APM login page
- APM Troubleshooting with ADTest
- [APM VPE VarAssign UPN or Logonname Auth](APM VarAssign UPN or Logonname)
Kerberos and APM
- Basic Auth and Kerberos logon
- Kerberos servicePrincipalName (SPN)
- [F5 Devcentral Kerberos is easy][7]
- [Kerberos Survival Guide][8]
- [Setting up Kerberos Authentication for a Website in IIS][10]
- [Kerberos SSO across External trust (KRB Constrained Troubleshooting)][11]
- [Kerberos Constraint Delegation White Paper][12]
- [Microsoft: How the Kerberos Version 5 Authentication Protocol Works][13]
- [Digicomp: Troubleshooting Kerberos Authentisierung][14]
- [Microsoft: Configuring Kerberos authentication for load-balanced Client Access services][15]


Links
[1]: https://msdn.microsoft.com/en-us/library/cc237015.aspx
[2]: https://devcentral.f5.com/articles/configuring-apm-client-side-ntlm-authentication
[3]: https://devcentral.f5.com/articles/leveraging-big-ip-apm-for-seamless-client-ntlm-authentication
[4]: https://devcentral.f5.com/questions/how-to-use-ntlm-to-basically-bypass-the-f5-apm-login-page
[5]: https://support.f5.com/kb/en-us/products/big-ip_apm/manuals/product/apm-authentication-single-sign-on-11-5-0/9.html
[6]: https://www.msxfaq.de/windows/kerberos/kerberosspn.htm
[7]: https://devcentral.f5.com/articles/kerberos-is-easy-part-1
[8]: https://social.technet.microsoft.com/wiki/contents/articles/4209.kerberos-survival-guide.aspx
[9]: https://f5guru.com/2015/07/02/apm-troubleshooting-with-adtest/
[10]: https://blogs.msdn.microsoft.com/chiranth/2014/04/17/setting-up-kerberos-authentication-for-a-website-in-iis/
[11]: https://devcentral.f5.com/questions/kerberos-sso-across-external-trust
[12]: https://f5.com/Portals/1/Cache/Pdfs/2421/kerberos-constrained-delegation-and-protocol-transition-in-smart-card-pki-architecture-.pdf
[13]: https://technet.microsoft.com/en-us/library/cc772815(WS.10).aspx
[14]: https://news.digicomp.ch/de/2013/11/20/troubleshooting-kerberos-authentisierung/
[15]: https://technet.microsoft.com/en-us/library/ff808312.aspx
Tuning the OneConnect Profile
Description
OneConnect™ is a feature of the BIG-IP LTM system that improves web application performance and decreases server load by reducing the concurrent connections and connection rate on back-end servers.
Kerberos Delegation & Protocol Transition
A very good video from Lightboard Lessons from F5:
Link: https://devcentral.f5.com/articles/lightboard-lessons-kerberos-delegation-protocol-transition-32686
BigIP DNS (Formerly GTM)
Preface
The following is from the BigIP DNS Documentation: https://support.f5.com/kb/en-us/products/big-ip-dns/manuals/product/bigip-dns-load-balancing-13-1-0/
Introducing BIG-IP DNS
BIG-IP® DNS (formerly GTM™) is a system that monitors the availability and performance of global resources and uses that information to manage network traffic patterns. BIG-IP DNS uses load balancing algorithms, topology-based routing, and iRules® to control and distribute traffic according to specific policies.
About global server load balancing
BIG-IP® DNS provides tiered global server load balancing (GSLB). BIG-IP DNS distributes DNS name resolution requests, first to the best available pool in a wide IP, and then to the best available virtual server within that pool. BIG-IP DNS selects the best available resource using either a static or a dynamic load balancing method. Using a static load balancing method, BIG-IP DNS selects a resource based on a pre-defined pattern. Using a dynamic load balancing method, BIG-IP DNS selects a resource based on current performance metrics collected by the big3d agents running in each data center.
Static load balancing methods
This table describes the static load balancing methods available in BIG-IP® DNS.
| Name | Description | Recommended Use | Wide IP Load Balancing | Preferred Method | Alternate Method | Fallback Method |
|---|---|---|---|---|---|---|
| Drop Packet | BIG-IP DNS drops the DNS request. | Use Drop Packet for the Alternate load balancing method when you want to ensure that BIG-IP DNS does not offer in a response a virtual server that is potentially unavailable. | No | Yes | Yes | Yes |
| Fallback IP | BIG-IP DNS distributes DNS name resolution requests to a virtual server that you specify. This virtual server is not monitored for availability. | Use Fallback IP for the fallback load balancing method when you want BIG-IP DNS to return a disaster recovery site when the preferred and alternate load balancing methods do not return an available virtual server. | No | No | No | Yes |
| Global Availability | BIG-IP DNS distributes DNS name resolution requests to the first available virtual server in a pool. BIG-IP DNS starts at the top of a manually configured list of virtual servers and sends requests to the first available virtual server in the list. Only when the virtual server becomes unavailable does BIG-IP DNS send requests to the next virtual server in the list. Over time, the first virtual server in the list receives the most requests and the last virtual server in the list receives the least requests. | Use Global Availability when you have specific virtual servers that you want to handle most of the requests. | Yes | Yes | Yes | Yes |
| None | BIG-IP DNS distributes DNS name resolution requests skipping either the next available pool in a multiple pool configuration or the current load balancing method. If all pools are unavailable, BIG-IP DNS returns an aggregate of the IP addresses of all the virtual servers in the pool using BIND. | Use None for the alternate and fallback methods when you want to limit each pool to a single load balancing method. If the preferred load balancing method fails, BIG-IP DNS offers the next pool in a load balancing response. | No | No | Yes | Yes |
| Ratio | BIG-IP DNS distributes DNS name resolution requests among the virtual servers in a pool or among pools in a multiple pool configuration using weighted round robin, a load balancing pattern in which requests are distributed among several resources based on a priority level or weight assigned to each resource. | Use Ratio when you want to send twice as many connections to a fast server and half as many connections to a slow server. | Yes | Yes | Yes | Yes |
| Return to DNS | BIG-IP DNS immediately distributes DNS name resolution requests to an LDNS for resolution. | Use Return to DNS when you want to temporarily remove a pool from service. You can also use Return to DNS when you want to limit a pool in a single pool configuration to only one or two load balancing attempts. | No | Yes | Yes | Yes |
| Round Robin | BIG-IP DNS distributes DNS name resolution requests in a circular and sequential pattern among the virtual servers in a pool. Over time each virtual server receives an equal number of requests. | Use Round Robin when you want to distribute requests equally among all virtual servers in a pool. | Yes | Yes | Yes | Yes |
| Static Persist | BIG-IP DNS distributes DNS name resolution requests to the first available virtual server in a pool using the persist mask with the source IP address of the LDNS and a hash algorithm to determine the order of the virtual servers in the list. This hash algorithm orders the virtual servers in the list differently for each LDNS that is passing traffic to the system taking into account the specified CIDR of the LDNS. Each LDNS (and thus each client) generally resolves to the same virtual server; however, when the selected virtual server becomes unavailable, BIG-IP DNS sends requests to another virtual server until the original virtual server becomes available. Then BIG-IP DNS again resolves requests to that virtual server. | Use Static Persist when you want requests from a specific LDNS to resolve to a specific virtual server. | No | Yes | Yes | Yes |
| Topology | BIG-IP DNS distributes DNS name resolution requests using proximity-based load balancing. BIG-IP DNS determines the proximity of the resource by comparing location information derived from the DNS message to the topology records in a topology statement you have configured. | Use Topology when you want to send requests from a client in a particular geographic region to a data center or server located in that region. | Yes | Yes | Yes |
Yes |
Dynamic load balancing methods
This table describes the dynamic load balancing methods available in BIG-IP® DNS.
| Name | Description | Wide IP load balancing | Preferred method | Alternate method | Fallback method |
|---|---|---|---|---|---|
| Completion Rate | BIG-IP® DNS distributes DNS name resolution requests to the virtual server that currently maintains the least number of dropped or timed-out packets during a transaction between a data center and the client's LDNS. | No | Yes | No | Yes |
| CPU | BIG-IP DNS distributes DNS name resolution requests to the virtual server that currently has the most CPU processing time available. | No | Yes | No | Yes |
| Hops | BIG-IP DNS distributes DNS name resolution requests to a virtual server in the data center that has the fewest router hops from the client's LDNS. BIG-IP DNS uses the traceroute utility to track the number of router hops between a client's LDNS and each data center. | No | Yes | No | Yes |
| Kilobytes/Second | BIG-IP DNS distributes DNS name resolution requests to the virtual server that is currently processing the fewest number of kilobytes per second. Use Kilobytes/Second only with virtual servers for which BIG-IP DNS can collect the kilobytes per second metric. | No | Yes | No | Yes |
| Least Connections | BIG-IP DNS distributes DNS name resolution requests to virtual servers on BIG-IP® Local Traffic Manager™ (LTM®) that currently hosts the fewest connections. Use Least Connections only with LTM servers. | No | Yes | No | Yes |
| Packet Rate | BIG-IP DNS distributes DNS name resolution requests to the virtual server that is currently processing the fewest number of packets per second. | No | Yes | Yes | Yes |
| Quality of Service | BIG-IP DNS distributes DNS name resolution requests to virtual servers based on a score assigned to each virtual server that is calculated from current performance metrics. Use Quality of Service only when you have configured BIG-IP DNS to calculate an overall score for each virtual server based on performance metrics. | No | Yes | No | Yes |
| Round Trip Time | BIG-IP DNS distributes DNS name resolution requests to the virtual server with the fastest measured round trip time between a data center and a client's LDNS. | No | Yes | No | Yes |
| Virtual Server Score | BIG-IP DNS distributes DNS name resolution requests to virtual servers on LTM based on a user-defined ranking. Use Virtual Server Score only with LTM systems on which you have assigned scores to each virtual server. | No | Yes | Yes | Yes |
| Virtual Server Capacity | BIG-IP DNS distributes DNS name resolution requests to virtual servers in a list that are weighted by the number of available virtual servers in the pool. Use Virtual Server Capacity for load balancing virtual servers managed by LTM Systems. BIG-IP DNS selects a virtual server that has the most available (UP) members. When selecting a virtual server from a wide IP pool and two or more virtual servers result in equal scores, BIG-IP DNS will return one of the equal scored virtual servers randomly. | No | Yes | Yes | Yes |
Operation
The Big-IP can be configured to use either tmm or mgmt interfaces for remote authentication (LDAP, TACACS, RADIUS, etc.) traffic.
Problem
When you want configure remote authentication on a F5 BIG-IP system you need to decide where the traffic will be routed. You need to specify either tmm or the management interface for remote authentication traffic.
tmm or management interface leads to another source ip and path, this can be set with the right routing configuration.
F5 Architecture
Now the F5 BIG-IP has two network stacks, tmm and linux, the following picture explains the difference:
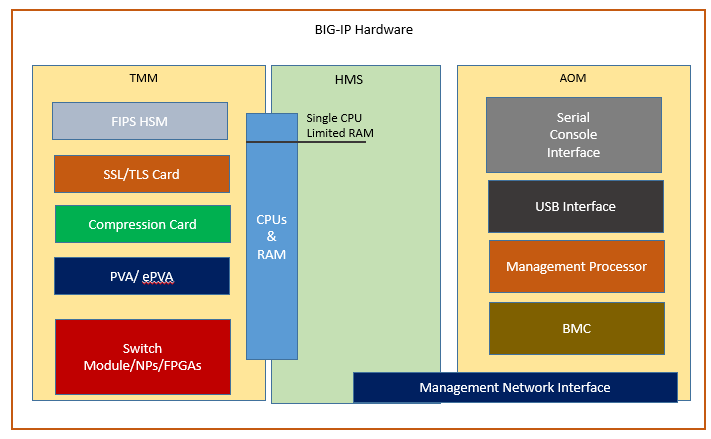
So, user processes can communicate over the tmm switch module or over the Mgmt Processor (linux kernel). The decision is made by setting route configuration.
Routing
BIG-IP routing tables
The BIG-IP routing table consists of a combination of routing subtables. A subtable for management routes, and a subtable for TMM routes. Routes in the TMM subtable are defined with a lower metric than routes in the management subtable. As a result, if an equally specific route exists as both a TMM route and a management route, the system will prefer the TMM route. This also applies if the only defined management route is a default gateway, the system will prefer the TMM default gateway.
TMM switch routes are routes that the BIG-IP system uses to forward traffic through the TMM switch interfaces instead of through the management interface. Traffic sourced from a TMM (self IP) address will always use the most specific matching TMM route. Traffic sourced from a TMM address will never use a management route. When TMM is not running, the TMM addresses are not available, and all TMM routes are removed. As a result, when TMM is not running, all outbound administrative traffic uses the most specific matching management route.
The BIG-IP system maintains two kinds of routes:
Management routes
Management routes are routes that the BIG-IP system uses to forward traffic through the special management interface. The BIG-IP system stores management routes in the Linux (that is, kernel) routing table.
Management routing parameters
Viewing, deleting, and adding management IP addresses
- To view the management IP address, type the following command:
tmsh list /sys management-ip
- To delete an existing management IP address, use the following command syntax, replacing <address> with the management IP address:
tmsh delete /sys management-ip <address>
- To add a new management IP address, use the following command syntax, replacing <address> with the management IP address and <netmask> with the network mask:
tmsh create /sys management-ip <address>/<netmask>
TMM routes
TMM routes are routes that the BIG-IP system uses to forward traffic through the Traffic Management Microkernel (TMM) interfaces instead of through the management interface. The BIG-IP system stores TMM routes in both the TMM and kernel routing tables.
TMM routing parameters
- To view all routes on the system, type:
tmsh show /net route - To view all configured static routes on the system, type:
tmsh list /net route - To create a static route, use the following command syntax:
create /net route <route destination/mask> <gw|pool|interface|blackhole> <IP address|pool name|VLAN/Tunnel name>
Examples:To create a static route to the 10.10.22.0/24 network using gateway 30.30.30.158, you enter the following command:
tmsh create /net route 10.10.22.0/24 gw 30.30.30.158To create a static route to a single destination host 10.10.99.111 using the gateway 30.99.99.254, you enter the following command:
tmsh create /net route 10.10.99.111/32 gw 30.99.99.254
Links
Further information can you get on this excellent F5 documentation:
K13284: Overview of management interface routing
Useful CLI commands F5
CLI commands
tmsh on F5 is the CLI tool to get and set all config of the F5. You can get the same configuration options like in the F5 UI.
Use "tmsh" to start an interactive shell or use "tmsh show ..." directly to get an output of the command
The tmsh and tmctl utilities include commands for troubleshooting device trust and device group operations.
Useful CLI command line troubleshooting tools
Show Commands
| Command | Description |
|---|---|
| tmsh show sys license | The output displays licensing information for the BIG-IP system, including a list of active modules. |
| tmsh show sys license | grep "Service Check Date" | Use the tmsh command to see the license check date. |
| tmsh list auth partition | Displays the used partition names |
| tmsh run cm sniff-updates | Displays the commit ID updates that occur over the configuration management communications channel. |
| tmsh run cm watch-devicegroup-device | Displays information about the devices in the device group to which the local device belongs. |
| tmsh run cm watch-sys-device | Displays information about the local device. |
| tmsh run cm watch-trafficgroup-device | Displays information about the traffic groups associated with devices in a device group. |
| tmsh sys db configsync.timesyncthreshold | Displays the time threshold for the time difference between devices in the trust domain. If the time difference between devices exceeds the configured threshold value, the BIG-IP system logs an error. |
| tmsh show cm device | Displays the time difference, in seconds, between the local device and each of the other devices in the trust domain. |
| tmsh show cm traffic-group | Displays status for all traffic groups on the local device, including the next-active device, the previously-active device, and the reason that an active traffic group is active on its current device. This information is also available with the tmsh cm traffic-group all-properties command. |
| tmsh show cm sync-status | Displays the current network connection status, either connected or disconnected. |
| tmsh show sys ha-mirror | Displays the current status of mirrored connections. |
| tmsh show cm failover-status | In addition to other information, displays log messages when:
|
| tmctl sod_tg_conn_stat | Displays SOD messaging statistics for each type of message sent and received. |
| tmctl sod_tg_msg_stat | Displays the outgoing packets from the SOD daemon to the other devices in the device group. |
| tmsh list net interface media-active vendor vendor-partnum serial module-description | Show installed SFP modules with their serials. |
| tmsh list net interface all-properties | Show all installed interfaces with all properties |
| tmsh list ltm virtual recursive one-line | grep "your filter" | Displays all virtual servers as one-liner, can also be used with the grep filter. |
| tmsh show ltm virtual | egrep "Availability" | awk '{$1=$1;print}' | sort | uniq -c |
Count status of virtual servers. Example output: |
| tmsh show ltm pool | egrep "Availability" | awk '{$1=$1;print}' | sort | uniq -c |
Count status of pools. Example output: |
| tmsh list ltm virtual description destination pool profiles |
List Virtual Servers with all the properties. Additional properties can be added, use tab for a full list in interactive tmsh. |
Set Commands
| Command | Description |
|---|---|
| tmsh run cm config-sync <sync_direction> <sync_group> |
For example, the following command pushes the local device's configuration to remote devices in the Syncfailover device group: run cm config-sync to-group Syncfailover To do a full sync use: run cm config-sync to-group Syncfailover force-full-load-push |
| tmsh run sys failover standby | Specifies that the active unit or cluster fails over to a Standby state, causing the standby unit or cluster to become Active. |
| tmsh run sys failover offline | Changes the status of a unit or cluster to Forced Offline. If persist or no-persist are not specified, the change in status will be persisted in-between system restarts. |
| tmsh modify cm trust-domain Root add-device { ca-devices true | false ip_address } device-name device_name username admin password admin | In addition to adding a device to a trust domain, returns error messages for these conditions:
|
Backup Commands
| Command | Description |
|---|---|
| tmsh save sys ucs <YEAR><MONTH><DAY>.ucs |
Using tmsh to generate a UCS backup file. Example with the actual Year Month and Date.
|
| tmsh load sys ucs ucs_archive_name |
Restore the UCS archive on the system. |
| tmsh delete sys ucs ucs_archive_name |
Delete the named UCS archive on the system. |
F5 fix Guided Configuration Installation
Customers are using more and more Guided Configuration on F5 systems.
Sometimes we have the problem that GC is not working and shows a 404 not-found error or similar.
The problem is that when GC is not working properly anymore you cannot get to the GUI part to install or update GC to the actual version.
K13120484: Guided configuration cannot load page - The requested URL was not found on this server
After clicking Guided Configuration in GUI we can see:
The requested URL was not found on this server.
Recommended Actions
Follow below steps:
- Log on to the BIG-IP APM command line. Run backup creation to have a snapshot to revert to:
# make sure to be in bash mode:
# tmsh save sys ucs $(echo $HOSTNAME | cut -d'.' -f1)-$(date +%H%M-%m%d%y)_pre
- Stop the restjavad and restnoded with the following commands :
# bigstart stop restjavad restnoded
- Run the following commands:
# tar -czpf /var/tmp/rest_storage_pre.tgz /var/config/rest/storage/*
# rm -f /var/config/rest/storage; clear-rest-storage
Important: This step will remove SSLO configuration from device - if SSLO module is in use. Also if device is managed by BIG-IQ, BIG-IP device might have to be rediscovered on BIG-IQ systems.
Start the restjavad and restnoded daemons in the standby unit by running the following commands
# bigstart start restjavad restnoded
- After few minutes navigate to Access >> Guided Configuration to verify if the error message is no longer seen.
- Raise service ticket with F5 support and share files generated with fresh Qkview with support.
New Installation of GC Components
The following shows how to proceed with curl and REST-API to do a new installation of the GC components.
You can download the actual GC at https://my.f5.com
Upload File
curl -i -sk -u <username> -X POST -H "Content-Type: application/octet-stream" -H "Content-Range: 0"\
 --data-binary "<filename>" "https://<f5-hostname>/mgmt/shared/file-transfer/uploads/<filename>"
Install File
curl -k -u <username> -X POST -d '{"filePath": "/var/config/rest/downloads/<filename>
"}' -H 'Content-Type: application/json' 'https://<f5-hostname>/mgmt/tm/access/bundle-install-tasks' | jq
Check installation of file
curl -k -u <username> -d '{"filePath": "/var/config/rest/downloads/<filename>"}'\
 -H 'Content-Type: application/json' 'https://<f5-hostname>/mgmt/tm/access/bundle-install-tasks' | jq
Links
- https://clouddocs.f5.com/products/big-iq/mgmt-api/v7.0.0/ApiReferences/bigiq_public_api_ref/r_file_uploads.html
- https://techdocs.f5.com/kb/en-us/products/big-ip_apm/releasenotes/product/relnote-guided-config-7-0.html#unique_900002437
-
K13120484: Guided configuration cannot load page - The requested URL was not found on this server
Flow Traffic TCP
F5 TCP Traffic Flow Explained here: https://community.f5.com/t5/technical-forum/tcp-traffic-path-diagram/m-p/258192
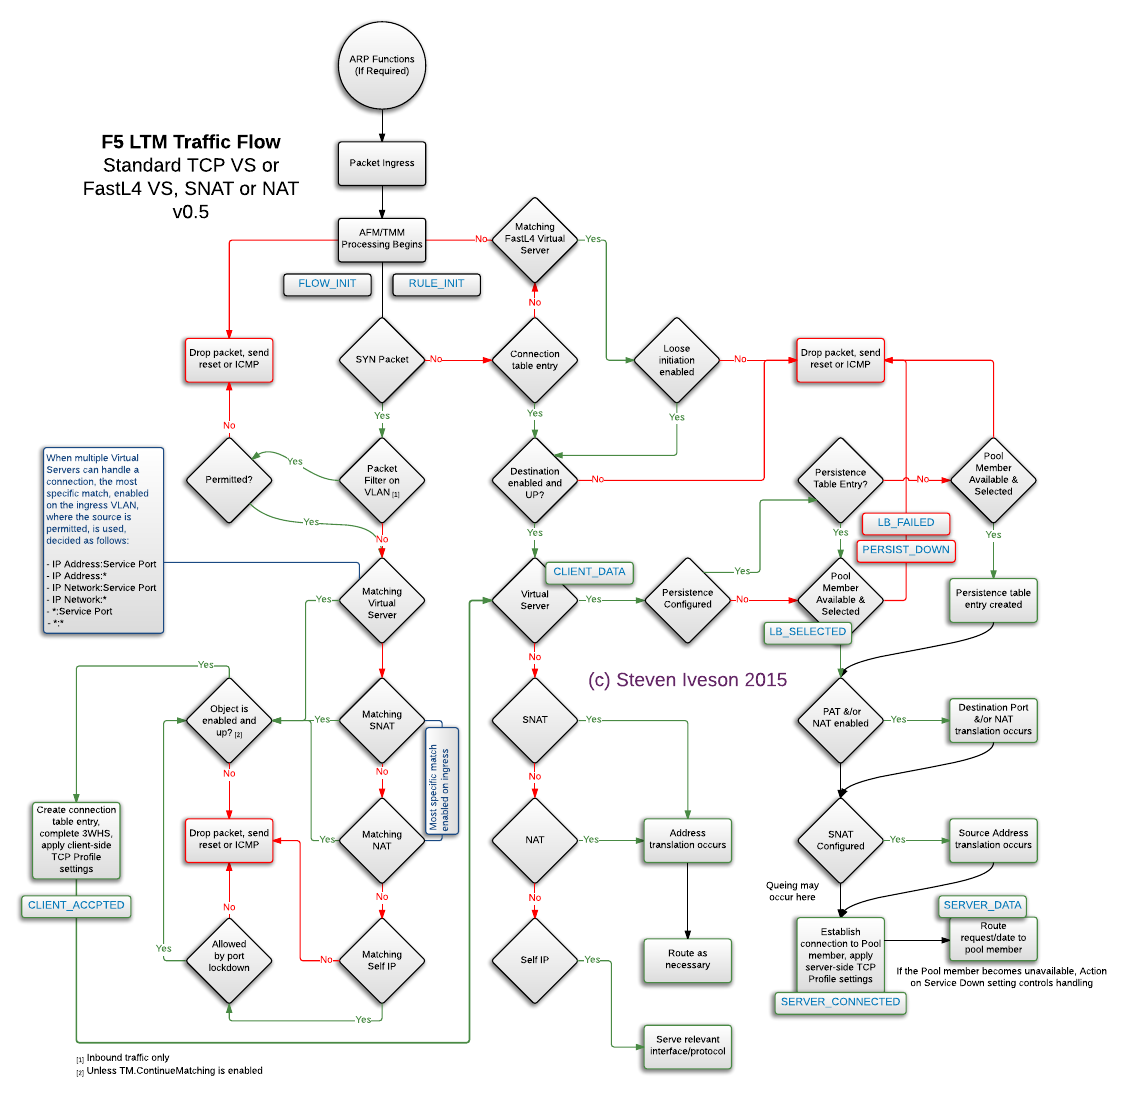
Flow iRule Diagram (Event order)
F5 iRule Flow (Event Order) explained here: https://community.f5.com/t5/codeshare/irule-event-order-flowchart/ta-p/286343

Upgrade an Active-Standby Cluster
In this example we need to upgrade the F5 BIG-IP from 16.1.x to the actual version 16.1.3.5 (7.8.2023).
Download Software Image
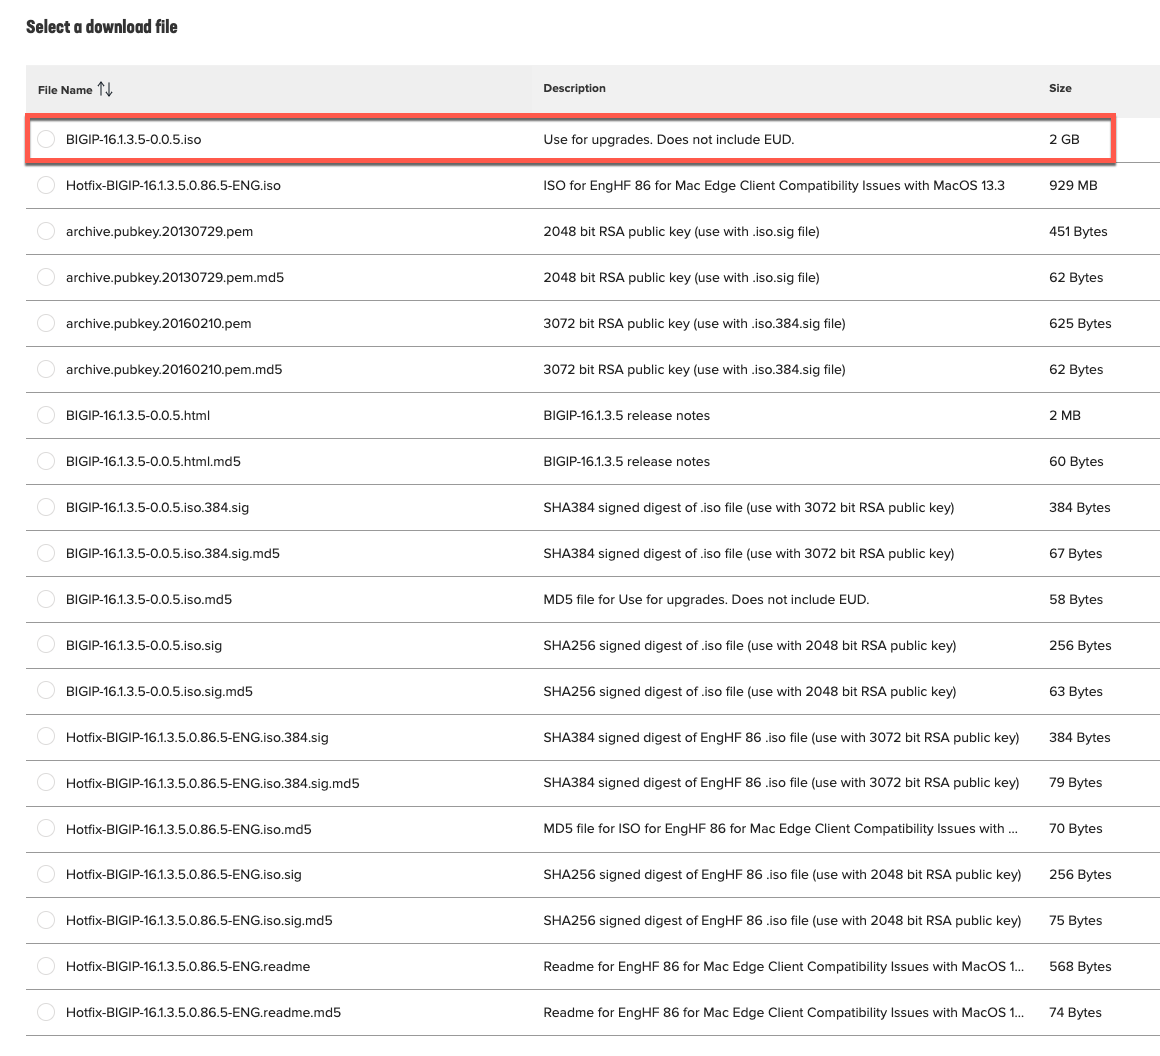
Login to https://my.f5.com, search and download the ISO image of the version you want to upgrade:
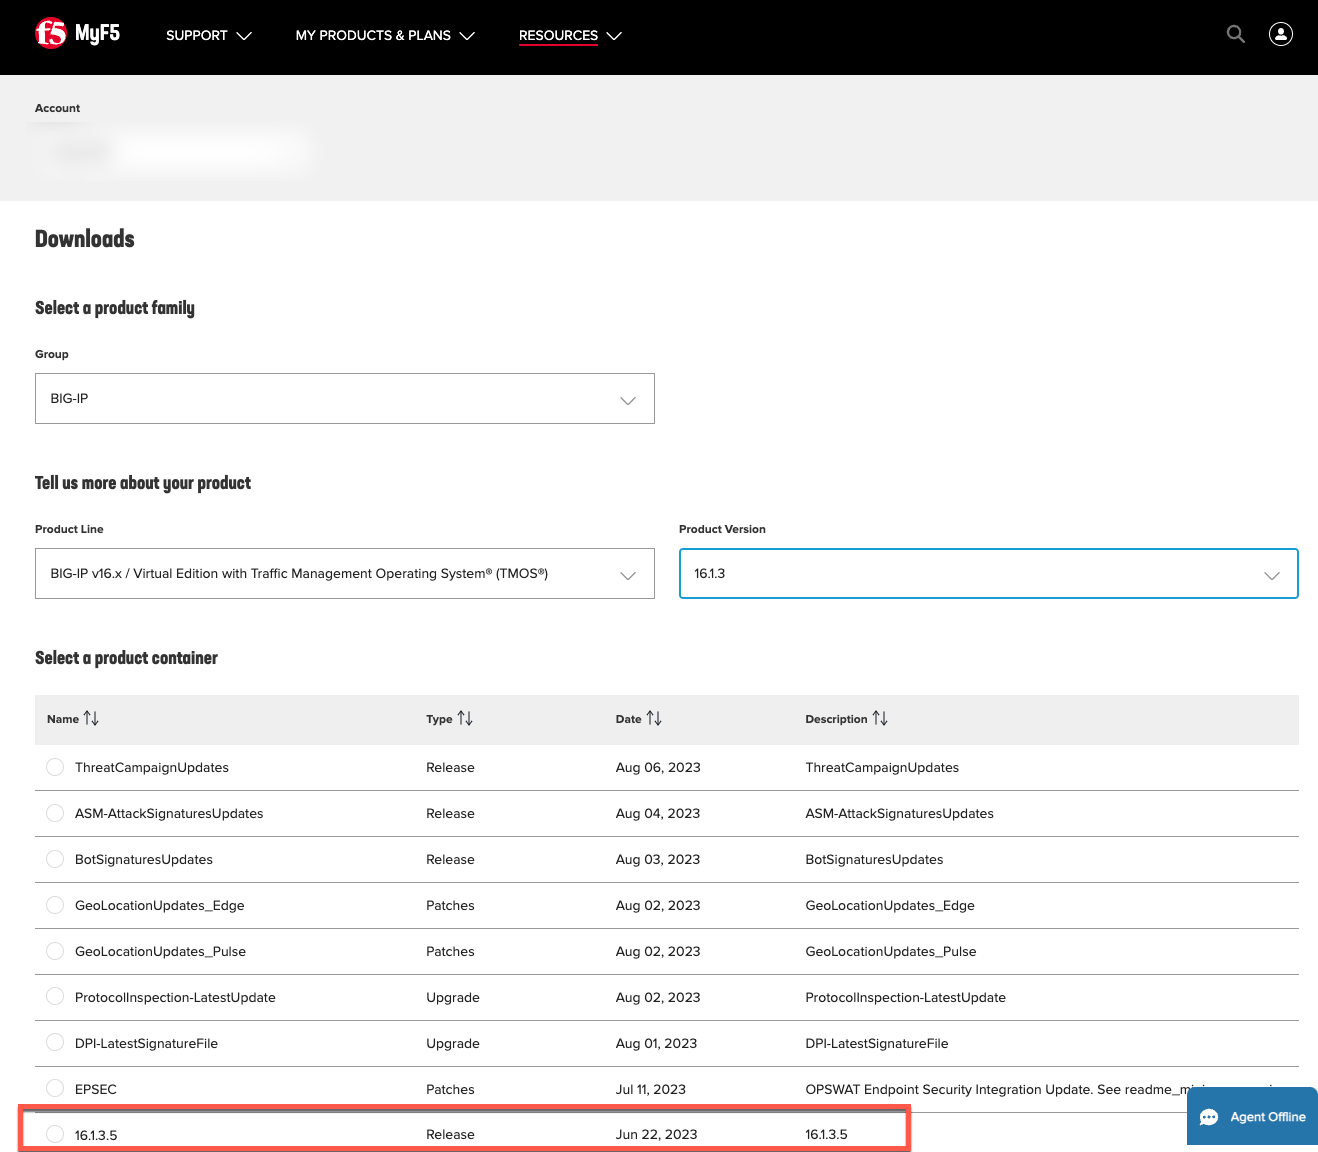
Select the release and download the ISO:
Create System Archive (Config Backup)
On both nodes create a archive of the config and download it to your PC before upgrading.
You can do this using the WebUI (Or use the tmsh command line) browse to System - Archives and press Create button.

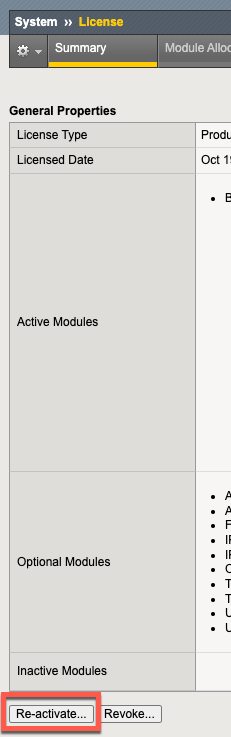
Reactivate License
Maybe your license needs to be reactivated to be able to do the upgrade. This process is described here:
K7727: License activation may be required before a software upgrade for BIG-IP
Use the tmsh command to see the license check date:
tmsh show sys license | grep "Service Check Date"Reference the License Check Date table listed previously in the link above, and verify that the service check date is a later date than the license check date listed for the version to which you are upgrading.
If the service check date is earlier than the license check date a license reactivation is needed prior to upgrade.
Click the Ra-activate button under the License section:
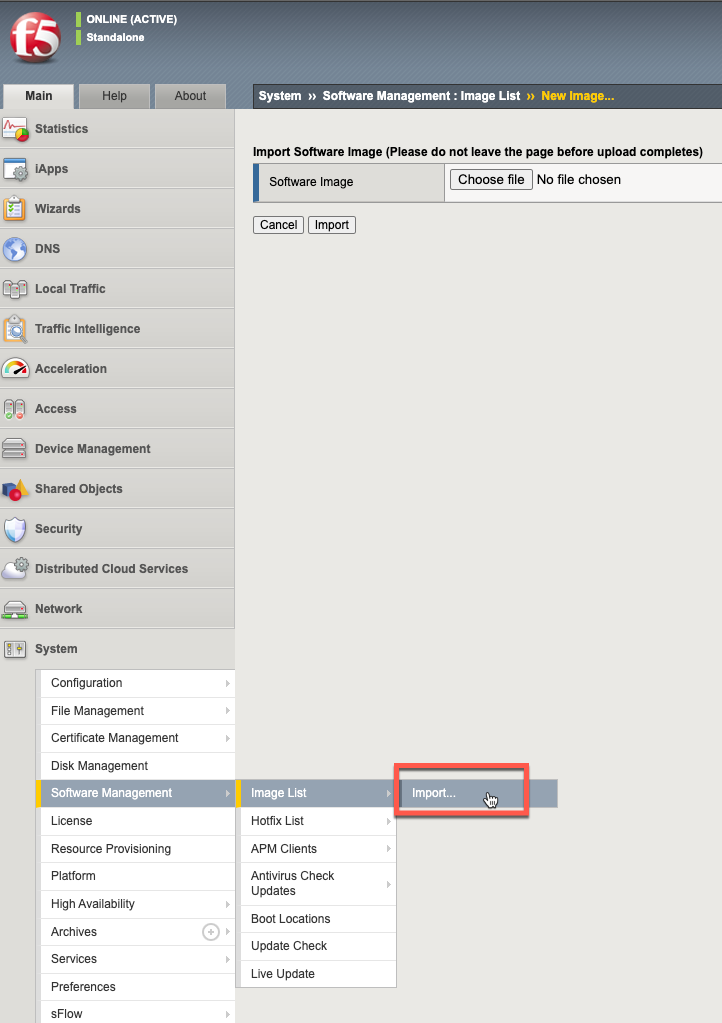
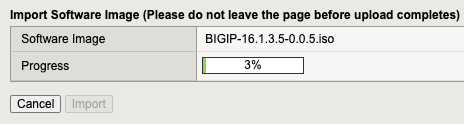
Import downloaded ISO image
On both nodes import the downloaded ISO image to the repository on the F5 BIG-IP:
Clean installation in a Boot Location
On both nodes the uploaded image is now available in the "Available Images section":
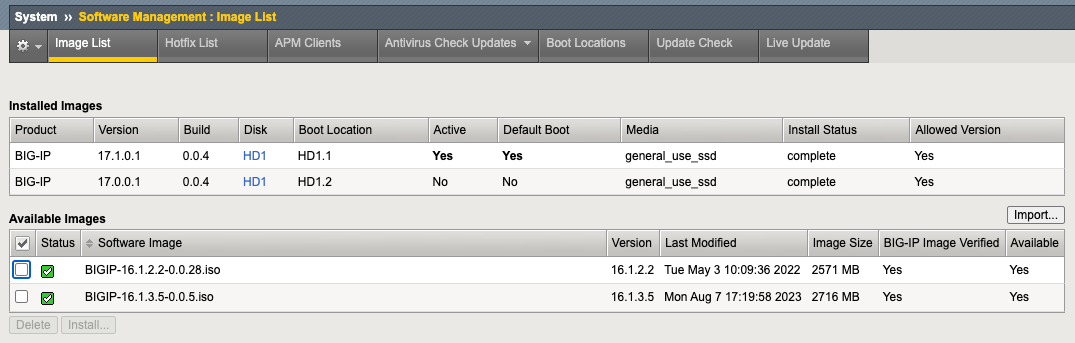
To get a clean installation I would recommend to delete an existing volume and recreate it, it's done like this:
Click on HD1 Disk in System - Software Management : Image List
Delete the not used older volume, in the case above it is HD1.2.
Now you can select in Available Images the new BIG-IP iso which you want to have a clean installation and recreate the volume like here (Specify "2" in this case)
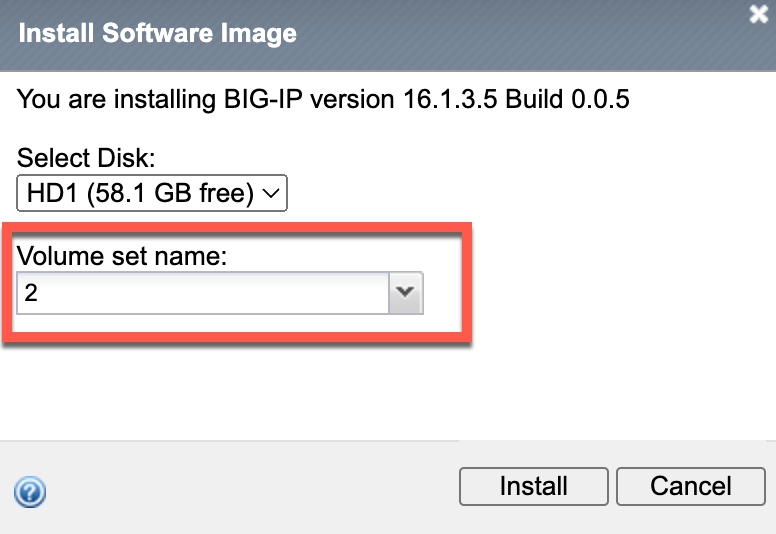
After about 1/2h the installation is finished.
Boot the new installed volume
Select now the new volume in System - Software Management : Boot Locations to reboot it:

Important
Select "Install Configuration" to "yes" in the next dialog. This is only needed on F5 Hardware and VM, not Viprion Environments.
It will convert your configuration from the old Volume to the newly booted volume then.
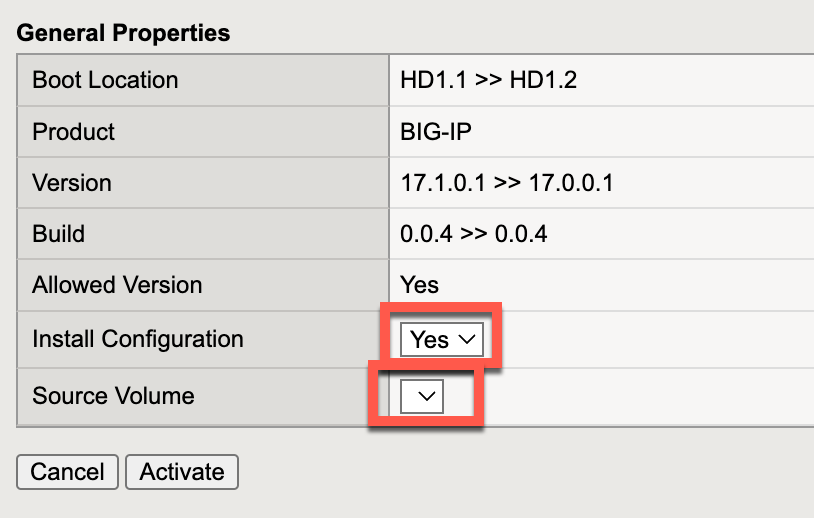
After the reboot the system will be ready with the new version and the converted config from the old volume.
Preserving client IP address in any TCP session
When you use a reverse proxy like the F5 BIG-IP is, there's always a big discussion how to preserving the client ip address in any TCP session.
F5 has a document describing the different possibilities:
- If the traffic is HTTP, you can use x-forwarded-for feature.
Note: For more information refer to: K4816: Using the X-Forwarded-For HTTP header to preserve the original client IP address for traffic translated by a SNAT object - Preserving the client IP in layer 4 or layer 3.
Note: There is no option can be configured in the virtual server without disabling the SNAT. This is by design as BIG-IP acts a full-proxy in most cases. - Disabling SNAT is an option, which means no Address Translation occurs.
Note: You must ensure that servers will use F5 as the default gateway for replying back to the client, in order to prevent asymmetric routing. - If you are open to complex solution, you may use TCP Options to insert the client-IP into the TCP Header Options field.
Note: Configuring the BIG-IP to insert into the TCP header of a connection can be a complicated implementation can be found in DevCentral, or F5 professional services.
For more information refer to: DevCentral: Accessing TCP Options from iRules
You can finde the document here:
K12757773: Preserving client IP address in any TCP session
Another possible solution to the problem
You can use the Proxy Protocol to preserve a client’s IP address when that client’s connection passes through a proxy.
What is the Proxy Protocol? It is a network protocol for preserving a client’s IP address when the client’s TCP connection passes through a proxy. Without such a mechanism, proxies lose this information because they act as a surrogate for the client, relaying messages to the server but replacing the client’s IP address with their own. This distorts the logs of upstream servers because the logs incorrectly indicate that all traffic originated at the proxy.
See here: https://www.haproxy.com/blog/use-the-proxy-protocol-to-preserve-a-clients-ip-address
This protocol is often used in Kubernetes clusters for preserving the source-ip address. In this case an external load balancer talks to the ingress controller with proxy protocol.
Link: https://kubernetes.io/docs/tutorials/services/source-ip/
Useful F5 Log Queries
Introduction
If you work with F5 BIG-IP you maybe need to know for example when a cluster failover has happened or a user has done some changes.
The following will describe some useful F5 log queries which you can use on the F5 logs or any central syslog server you're sending the F5 logs to.
All possible F5 Log Messages can be found here:
https://techdocs.f5.com/kb/en-us/products/big-ip_ltm/releasenotes/related/log-messages.html
F5 LTM Log Queries
Check in the Admin UI at System - Logs: Local Traffic
| Research | Log Query |
|---|---|
|
Show cluster switchover of a F5 BIG-IP
See here: 01340001 : HA Connection with peer %la:%d for traffic-group %s established 01340002 : HA Connection with peer %la:%d for traffic-group %s lost
|
HA Connection with peer
Example output:
|
|
TMM is very busy or is stalled.
See here: K10095: Error Message: Clock advanced by <number> ticks
Any value higher than 1000 does show a problem with too high load. |
Clock advanced by
Example output:
|
|
A Virtual Server is under high load
See here: 01010038 : Syncookie counter %d exceeded vip threshold %u for virtual = %A:%d
If the message shows multiple times there's maybe an attack going on or a high load on the Virtual Server. |
Syncookie counter
Example output:
|
|
Pool Member change
See here: 01010221 : Pool %s now has available members
The pool may have had no available members due to administrative action, monitors, connection limits, or other constraints on pool member selection. |
now has available members
Example output:
|
|
Status change detected on Pool
See here: 01070727 : "Pool %s member %s:%u monitor status up."
This message is logged when a status change is detected for the pool member. |
monitor status up
Example output:
|
|
Machine Boot or mcpd restart
See here: 01070427 : Initialization complete. The MCP is up and running
the mcpd process generates this message during the normal boot process after the configuration loads and mcpd reaches a running phase. Services are down when mcpd is restarted. |
The MCP is up and running
Example output:
|
F5 Audit Log Queries
Check in the Admin UI at System - Logs: Audit: List
| Research | Log Query |
|---|---|
| Show which user has done changes |
transaction
Example output:
|
Clearing the LCD and the Alarm LED remotely
Description
In some cases, you may want to remotely clear LCD warnings and the Alarm LED.
Performing this action may prevent onsite personnel from discovering and reporting an old warning, or having to teach the onsite personnel how to clear the LCD.
You can use the lcdwarn command line utility to control the LCD and the Alarm LED.
To display its usage, run the lcdwarn command without any arguments.
Note: You cannot view LCD warnings and Alarm LED messages remotely. To ensure that the alerts do not reappear, F5 recommends that you monitor the BIG-IP log files after you clear the LCD warnings or Alarm LED.
APM: Variable Assign
Variable assign best practice
Username / Domain Management
get username

session.logon.last.username
extract CN from certificate subject and set it in username variable
set subject [split [mcget {session.ssl.cert.subject}] ",="];
foreach {name value} $subject {
    if {[string trim $name] equals "CN"} {
        return [string trim $value];
    }
}
session.logon.last.username
combine username and domain variables
expr { "[mcget {session.logon.last.domain}]\\[mcget {session.logon.last.username}]" }session.ad.last.attr.userPrincipalName
Get the UPN when using AD-Auth. This variable is filled out with the UPN from the AD and can be used in the VPE.
remove UPN from session.logon.last.username:
expr { [string range [mcget {session.logon.last.username}] 0 [expr [string first "@" [mcget {session.logon.last.username}] 0] -1] ] }session.logon.last.ntdomain
extract NT domain name from logon name
if { [mcget {session.logon.last.username}] contains "\\" } {
    set username [string tolower [mcget {session.logon.last.logonname}]];
    return [string range $username 0 [expr {[string first "\\" $username] -1}] ];
} else {
    return {}
}
one-line code
expr {[set username [string tolower [mcget {session.logon.last.logonname}]]] contains "\\" ? [string range $username 0 [expr {[string first "\\" $username] -1}] ] : "" }session.logon.last.domain
static assignment from ntdomain
switch [string tolower [mcget {session.logon.last.ntdomain}]] {
    "domain1" { return "domain1.local" }
    "domain2" { return "domain2.local" }
    default { return "default.local" }
}
session.logon.last.username
Extract username name from logonname (full username from logon page even if split domain from username is checked)
set username [string trim [mcget {session.logon.last.logonname}]];
if { $username contains "\\" } {
     return [string range $username [expr {[string first "\\" $username] +1}] end ];
} else { return $username }
session.logon.last.upn
Extract UPN value from Certificate X509Extension
set extension [string tolower [mcget {session.ssl.cert.x509extension}]];
return [string range $extension [expr {[string first "othername:upn<" $extension] +14}] [expr {[string last ">" $extension] -1}] ];
Session / Timeout Management
session.inactivity_timeout
Change inactivity session timeout based on a checkbox on the logon page (logon variable trusted)
if { [mcget {session.logon.last.trusted}] == 1 } { return {5400} } else { return {1800} }one-line code (5400 seconds if condition before ? success, 1800 seconds else)
expr { [mcget {session.logon.last.trusted}] == 1 ? {5400} : {1800}}session.inactivity_timeout
Change inactivity session timeout based on client type (iOS, Android and WindowsPhone : half of inactivity timeout configured in profile parameters)
expr { [mcget {session.client.platform}] == "WindowsPhone" || [mcget {session.client.platform}] == "Android" || [mcget {session.client.platform}] == "iOS" ? [mcget {session.inactivity_timeout}]/2 : [mcget {session.inactivity_timeout}] }session.max_session_timeout
force to close the session à 17:00
expr { [clock scan "17:00"] - [mcget {session.user.starttime}] }session.max_session_timeout
After a AD query which retreive attribute logonHours, force to close the session when user at the end of allowed logon hours
set maximumSessionSeconds 604800
if {[set logonHours [mcget {session.ad.last.attr.logonHours}]] != "" && $logonHours != "FFFFFFFFFFFFFFFFFFFFFFFFFFFFFFFFFFFFFFFFFF"} {
    #convert string to binary string
    binary scan [binary format H* $logonHours] b* logon_hours_binary_string
    # evaluate the number of seconds from last sunday
    set time_from_sunday [expr {[clock seconds] - [clock scan "last sunday"]}];
    # search in string next hours with 0 value
    set current_index [expr {$time_from_sunday / 3600}];
    # convert the index to number of seconds from last sunday
    if {[set next_denied_index [string first 0 $logon_hours_binary_string$logon_hours_binary_string $current_index]] == $current_index } {return 0}
    # evaluate number on seconds to disconnect time
    return [expr { $next_denied_index*3600 - $time_from_sunday}]
} else { return $maximumSessionSeconds}
Windows Info
session.windows_info_os.last.fqdn
search and return FQDN hostname in computer names list after windows Info Box
foreach x [split [mcget {session.windows_info_os.last.computer}] "|"] {
    if { $x ends_with ".f5demo.lab" } {
        return $x
    }
}
session.windows_info_os.last.computer_name
search FQDN hostname in computer names list after windows Info Box, then return shortname (without domain name)
foreach x [split [mcget {session.windows_info_os.last.computer}] "|"] {
    if { $x ends_with ".f5demo.lab" } {
        return [lindex [split $x "."] 0]
    }
}
Machine Cert
To allow machine certificate revocation validation, add a variable assign with 2 following variables before OCSP or CRLDP boxes.
session.ssl.cert.whole
store machine certificate as it was user certificate
expr {[mcget {session.check_machinecert.last.cert.cert}]}session.ssl.cert.certissuer
store machine certificate issuer as it was user certificate issuer
expr {[mcget {session.check_machinecert.last.cert.issuer}]} HTTP auth returned cookie parsing
session.custom.http_auth_mycookie
extract from HTTP auth cookie list the cookie value of mycookie
expr { [lindex [regexp -inline {mycookie=([^;\\\r]*)} [mcget session.http.last.response_cookie]] 1] }replace portal or network access Webtop by full webtop if unsupported resource are assigned
Webtop can be:
- Portal webtop : define an internal web server as home page
- Network access Webtop : start automatically Network access when connected
-
Full Webtop : display all assigned ressources in one page hosted on the F5.
Some customers want to assign different webtop based on assigned ressources.
-
one portal ressource only -> portal webtop
- one Network access ressource only -> Network Access ressource
- more than one portal ressource -> Full webtop
- more than one Network access ressource -> Full webtop
- RDP, Application tunnel, SAML ressources assigned -> Full Webtop
In Advanced ressource assign, the last assigned webtop is applied to the session. If the user is assigned non portal ressource (ex : RDP) and portal webtop, he will not be allowed to connect.
session.assigned.webtop
this code code is used if portal or network access webtop are assigned and number of resources is supported only with full webtop
set fullwt /Common/wt-Full;
set wt [mcget {session.assigned.webtop}];
set pa [llength [mcget {session.assigned.resources.pa}]];
set at [llength [mcget {session.assigned.resources.at}]];
set na [llength [mcget {session.assigned.resources.na}]];
set rd [llength [mcget {session.assigned.resources.rd}]];
set saml [llength [mcget {session.assigned.resources.saml}]];
if {$rd || $at || $saml || ([expr { $pa + $na }] > 1)} {set wt $fullwt};
unset fullwt;
unset pa;
unset at;
unset na;
unset rd;
unset saml;
return $wt;
one-line code. Don't forget to replace "/Common/wt-Full" with your own webtop full in expression.
expr { [llength [concat [mcget {session.assigned.resources.rd}] [mcget {session.assigned.resources.at}] [mcget {session.assigned.resources.atsaml}]]] || [llength [concat [mcget {session.assigned.resources.pa}] [mcget {session.assigned.resources.na}]]] >1 ? "/Common/wt-Full" : [mcget {session.assigned.webtop}]}Same condition for Advanced resource Assign condition. This condition doesn't match with previous rules in the same Advanced resource assign. must be in a dedicated resource assign box.
expr { [llength [concat [mcget {session.assigned.resources.rd}] [mcget {session.assigned.resources.at}] [mcget {session.assigned.resources.atsaml}]]] || [llength [concat [mcget {session.assigned.resources.pa}] [mcget {session.assigned.resources.na}]]] >1}For Kerberos SSO
when working with Kerberos SSO, 2 variable sources must be set:
- username : must be equal to user sAMAccountName
-
domain : must be equal to user FQDN domain
When working on access policy with multiple SSO method depending on the URI, Host header or some other parameters, you may have conflict on default SSO variables.
For example, for Exchange :
-
activesync SSO profile is basic with username format is NTDOMAIN\username
-
Autodiscover SSP profile can be NTLM with
- username format is username
- domain format is NTDOMAIN
-
OWA SSO profile can be kerberos with
- username : must be equal to user sAMAccountName
- domain : must be equal to user FQDN domain like DOMAIN.LOCAL (different than NT Domain)
default SSO variables are :
-
session.sso.token.last.username
- session.sso.token.last.password
- session.logon.last.domain
to support multiple SSO on the same Access policy, I recommende to set new variables based on previous AD Query
session.krbsso.username
expr {[mcget {session.ad.last.attr.sAMAccountName}]}session.krbsso.domain
expr {[mcget {session.ad.last.actualdomain}]}Links
Thank you for this: https://devcentral.f5.com/s/articles/apm-variable-assign-examples-1107
F5 LTM TMSH Base Config
Config with LDAP Auth
## ======================================================
## Insert in TMSH "load sys config merge from-terminal"
## Finish with CTRL-D
## ======================================================

# - NTP settings
# ---------------------------------------------------
sys ntp {
    servers { 1.2.3.4 4.3.2.1 }
    timezone Europe/Zurich
}

# - SNMP settings
# ---------------------------------------------------
sys snmp {
    agent-addresses { tcp6:161 udp6:161 }
    allowed-addresses { 127.0.0.0/255.0.0.0 1.2.3.4/255.255.255.0 4.3.2.1/255.255.255.0 5.4.3.2/255.255.255.0 }
    communities {
        mycommunity1 {
            community-name public
            source default
        }
        mycommunity2 {
            community-name public2
        }
    }
    disk-monitors {
        root {
            minspace 2000
            path /
        }
        var {
            minspace 10000
            path /var
        }
    }
    process-monitors {
        bigd {
            process bigd
        }
        chmand {
            process chmand
        }
        httpd {
            max-processes infinity
            process httpd
        }
        mcpd {
            process mcpd
        }
        sod {
            process sod
        }
        tmm {
            max-processes infinity
            process tmm
        }
    }
    sys-contact contact@email.com
    sys-location "Location of F5"
}

# - DNS settings
# ---------------------------------------------------
sys dns {
    name-servers { 1.2.3.4 4.3.2.1 }
    search { localhost corp.domain.com mgmt.domain.com domain.com }
}

# - LDAP-Access settings for AD
# ---------------------------------------------------
auth ldap system-auth {
    bind-dn CN=LDAPProxyUser,OU=Accounts,OU=OrgUnit,DC=domain,DC=com
    bind-pw <pw>
    login-attribute userPrincipalName
    port ldaps
    search-base-dn DC=domain,DC=com
    servers { dc.domain.com }
    ssl enabled
}
auth password-policy { }
auth remote-role {
    role-info {
        LDAP-Administrator {
            attribute memberOF=CN=GRP_F5Admins,OU=Groups,DC=domain,DC=com
            console tmsh
            line-order 1
            role administrator
            user-partition All
        }
        LDAP-ReadOnly {
            attribute memberOF=CN=GRP_F5ReadOnly,OU=Groups,DC=domain,DC=com
            line-order 2
            role guest
            user-partition All
        }
        LDAP-ReadOnly-FW-Admins {
            attribute memberOF=CN=GRP_FWAdmins,OU=Groups,DC=domain,DC=com
            line-order 4
            role guest
            user-partition All
        }
        LDAP-ReadOnly-FW-RO {
            attribute memberOF=CN=GRP_FWReadOnly,OU=Groups,DC=domain,DC=com
            line-order 5
            role guest
            user-partition All
        }
    }
}
auth remote-user {
    default-partition Common
}
auth source {
    type active-directory
}

# - Local-User Einstellung
# ---------------------------------------------------
auth user admin {
    description "Admin User"
    password <pw>
    partition Common
    partition-access {
        all-partitions {
            role admin
        }
    }
    shell bash
}
auth user scriptuser {
    description "Script-User"
    password <pw>
    partition Common
    partition-access {
        all-partitions {
            role admin
        }
    }
    shell bash
}

# - Syslog
# ---------------
sys syslog {
    remote-servers {
        /Common/remotesyslog1 {
            host 1.2.3.4
            remote-port 514
        }
Debugging AD/LDAP
If you need to Debug AD/LDAP Auth see the following guide:
https://my.f5.com/manage/s/article/K15811
You should see logs in /var/log/secure
Enable debugging log with
tmsh modify /auth ldap all debug enabledDisable with:
tmsh modify /auth ldap all debug disabledConfig with RADIUS Auth
## ======================================================
## Insert in TMSH "load sys config merge from-terminal"
## Finish with CTRL-D
## ======================================================

# - NTP settings
# ---------------------------------------------------
sys ntp {
    servers { 1.2.3.4 4.3.2.1 }
    timezone Europe/Zurich
}

# - SNMP settings
# ---------------------------------------------------
sys snmp {
    agent-addresses { tcp6:161 udp6:161 }
    allowed-addresses { 127.0.0.0/255.0.0.0 1.2.3.4/255.255.255.0 4.3.2.1/255.255.255.0 5.4.3.2/255.255.255.0 }
    communities {
        mycommunity1 {
            community-name public
            source default
        }
        mycommunity2 {
            community-name public2
        }
    }
    disk-monitors {
        root {
            minspace 2000
            path /
        }
        var {
            minspace 10000
            path /var
        }
    }
    process-monitors {
        bigd {
            process bigd
        }
        chmand {
            process chmand
        }
        httpd {
            max-processes infinity
            process httpd
        }
        mcpd {
            process mcpd
        }
        sod {
            process sod
        }
        tmm {
            max-processes infinity
            process tmm
        }
    }
    sys-contact contact@email.com
    sys-location "Location of F5"
}

# - DNS settings
# ---------------------------------------------------
sys dns {
    name-servers { 1.2.3.4 4.3.2.1 }
    search { localhost corp.domain.com mgmt.domain.com domain.com }
}

# - RADIUS-Access settings
# ---------------------------------------------------
auth radius /Common/system-auth {
    servers {
        /Common/system_auth_name1
        /Common/system_auth_name2
    }
}
auth radius-server /Common/system_auth_name1 {
    secret <secret>
    server 1.2.3.4
}
auth radius-server /Common/system_auth_name2 {
    secret <secret>
    server 4.3.2.1
}
auth remote-role {
    role-info {
        /Common/LDAP-Administrator {
            attribute F5-LTM-User-Info-1=adm
            console tmsh
            line-order 1
            role administrator
            user-partition All
        }
        /Common/LDAP-Guest {
            attribute F5-LTM-User-Info-1=guest
            line-order 2
            role guest
            user-partition All
        }
        /Common/LDAP-application-security-editor {
            attribute F5-LTM-User-Info-1=wase
            console tmsh
            line-order 3
            role webapplicationsecurityeditor
            user-partition All
        }
    }
}
auth remote-user {
    default-partition Common
}
auth source {
    type radius
}

# - Local-User Einstellung
# ---------------------------------------------------
auth user admin {
    description "Admin User"
    password <pw>
    partition Common
    partition-access {
        all-partitions {
            role admin
        }
    }
    shell bash
}
auth user scriptuser {
    description "Script-User"
    password <pw>
    partition Common
    partition-access {
        all-partitions {
            role admin
        }
    }
    shell bash
}

# - Syslog
# ---------------
sys syslog {
    remote-servers {
        /Common/remotesyslog1 {
            host 1.2.3.4
            remote-port 514
}ASM Operation Manual
The Following Links are going to the F5 Operation Manual
Chapter 1: Guide introduction and contents
Chapter 2: Conventions Unique to the BIG-IP ASM Guide
Chapter 3: BIG-IP ASM event logging
Chapter 5: Regulatory compliance
Chapter 6: Common deployment topologies
Chapter 7: Common management tasks
Chapter 8: Troubleshooting BIG-IP ASM
Chapter 9: Collecting BIG-IP ASM data
Optimizing the support experience
F5 iControlREST
Some interesting links about F5 and REST-API
REST API Links
- iControl REST Fine-Grained Role Based Access Control
- iControl REST Home https://devcentral.f5.com/wiki/icontrolrest.homepage.ashx
- iControl REST Cookbook - Virtual Server https://devcentral.f5.com/articles/icontrol-rest-cookbook-24575
- Full examples of iControlREST for device and application service deployment https://devcentral.f5.com/articles/full-examples-of-icr-for-device-and-application-deployments
- Create a Pool and Virtual Server using REST API http://clouddocs.f5.com/training/community/firewall/html/class1/module1/lab1.html
- Demystifying iControl REST Part 7 - Understanding Transactions https://devcentral.f5.com/articles/demystifying-icontrol-rest-part-7-understanding-transactions-21404
- jmcalalang/F5-Postman-Collections https://github.com/jmcalalang/F5-Postman-Collections
- Postman Complete Workflows
- F5 curl REST API snippets
- f5er (CLI Utility in GO)
- BigIP Report Tool (Powershell)
REST API Python Examples
- Python script for updating data group https://devcentral.f5.com/codeshare/python-script-for-updating-data-group
- BIG-IP Config Cleaner
- F5 Configuration Backups with WEB GUI
- Devcentral - Python Virtual Server and Pool Creation
- Devcentral - Building a policy through python sdk
Automation and F5
- Automate F5 Initial Setup - iControl & Ansible
- Salt Example of iControl REST Library in Python
- Query Membership of Nodes in Pools
- K43713440: How to disable a pool member using REST API
F5 SNMP useful OIDs to monitor
SNMP polling Monitoring
You can use Simple Network Management Protocol (SNMP) to query and monitor all BIG-IP platforms for chassis fan speed, chassis temperature, CPU fan speed, CPU temperature, and power supply status.
You can use SNMP polling to obtain this information by importing the F5 management information base (MIB) file, F5-BIGIP-SYSTEM-MIB.txt, into your SNMP polling device and configuring the BIG-IP SNMP agent to allow access from the polling device.
The best way to test the different MIB OIDs you can do this as root user on the F5 locally.
The following describes common OIDs used for best practice monitoring.
System Monitoring
Check the F5-BIGIP-SYSTEM-MIB on oidview.com
For standard system values use the UCD-SNMP-MIB here:
Check the UCD-SNMP-MIB on oidview.com
ssCpuSystem
# snmpwalk -Ons -c public -v 2c 127.0.0.1 ssCpuSystem
ssCpuSystem.0 = INTEGER: 9
ssCpuUser
# snmpwalk -Ons -c public -v 2c 127.0.0.1 ssCpuUser
ssCpuUser.0 = INTEGER: 16
memAvailSwap
# snmpwalk -Ons -c public -v 2c 127.0.0.1 memAvailSwap
memAvailSwap.0 = INTEGER: 1023996 kB
sysPlatformInfo
# snmpwalk -Ons -c public -v 2c 127.0.0.1 sysPlatformInfo
sysPlatformInfoName.0 = STRING: C113
sysPlatformInfoMarketingName.0 = STRING: BIG-IP 4000
sysGeneral
# snmpwalk -Ons -c public -v 2c 127.0.0.1 sysGeneral
sysGeneralHwName.0 = STRING: C113
sysGeneralHwNumber.0 = STRING: deprecated
sysGeneralChassisSerialNum.0 = STRING: f5-abcd-efgh
sysProduct
# snmpwalk -Ons -c public -v 2c 127.0.0.1 sysProduct
sysProductName.0 = STRING: BIG-IP
sysProductVersion.0 = STRING: 15.1.0.2
sysProductBuild.0 = STRING: 0.9.9
sysProductEdition.0 = STRING: Engineering Hotfix
sysProductDate.0 = STRING: Wed Apr  1 15:44:08 PDT 2020
sysProductHotfix.0 = STRING: deprecated
sysCmSyncStatusColor
# snmpwalk -Ons -c public -v 2c 127.0.0.1 sysCmSyncStatusColor
sysCmSyncStatusColor.0 = INTEGER: red(2)
sysCmFailoverStatusId
# snmpwalk -Ons -c public -v 2c 127.0.0.1 sysCmFailoverStatus
sysCmFailoverStatusId.0 = INTEGER: standby(3)
sysCmFailoverStatusStatus.0 = STRING: STANDBY
sysCmFailoverStatusColor.0 = INTEGER: gray(4)
sysCmFailoverStatusSummary.0 = STRING: 1/1 standby
Possible values
| Value | Failover status | Description |
|---|---|---|
| 0 | unknown | The failover status of the device is unknown |
| 1 | offline | The device is offline |
| 2 | forcedOffline | The device is forced offline |
| 3 | standby | The device is standby |
| 4 | active | The device is active |
sysInterfaceStat
# snmpwalk -Ons -c public -v 2c 127.0.0.1 sysInterfaceStat
sysInterfaceStatResetStats.0 = INTEGER: 0
sysInterfaceStatNumber.0 = INTEGER: 11
sysInterfaceStatName."1.1" = STRING: 1.1
sysInterfaceStatName."1.2" = STRING: 1.2
sysInterfaceStatName."1.3" = STRING: 1.3
sysInterfaceStatName."1.4" = STRING: 1.4
sysInterfaceStatName."1.5" = STRING: 1.5
sysInterfaceStatName."1.6" = STRING: 1.6
sysInterfaceStatName."1.7" = STRING: 1.7
sysInterfaceStatName."1.8" = STRING: 1.8
sysInterfaceStatName."2.1" = STRING: 2.1
sysInterfaceStatName."2.2" = STRING: 2.2
sysInterfaceStatName."mgmt" = STRING: mgmt
sysInterfaceStatPktsIn."1.1" = Counter64: 0
sysInterfaceStatPktsIn."1.2" = Counter64: 0
sysInterfaceStatPktsIn."1.3" = Counter64: 0
sysInterfaceStatPktsIn."1.4" = Counter64: 0
sysInterfaceStatPktsIn."1.5" = Counter64: 0
sysInterfaceStatPktsIn."1.6" = Counter64: 0
sysInterfaceStatPktsIn."1.7" = Counter64: 0
sysInterfaceStatPktsIn."1.8" = Counter64: 0
sysInterfaceStatPktsIn."2.1" = Counter64: 511394733
sysInterfaceStatPktsIn."2.2" = Counter64: 633106223
sysInterfaceStatPktsIn."mgmt" = Counter64: 361514396
sysInterfaceStatBytesIn."1.1" = Counter64: 0
sysInterfaceStatBytesIn."1.2" = Counter64: 0
sysInterfaceStatBytesIn."1.3" = Counter64: 0
sysInterfaceStatBytesIn."1.4" = Counter64: 0
sysInterfaceStatBytesIn."1.5" = Counter64: 0
sysInterfaceStatBytesIn."1.6" = Counter64: 0
sysInterfaceStatBytesIn."1.7" = Counter64: 0
sysInterfaceStatBytesIn."1.8" = Counter64: 0
sysInterfaceStatBytesIn."2.1" = Counter64: 501710178927
sysInterfaceStatBytesIn."2.2" = Counter64: 633330429177
sysInterfaceStatBytesIn."mgmt" = Counter64: 91126105221
sysInterfaceStatPktsOut."1.1" = Counter64: 0
sysInterfaceStatPktsOut."1.2" = Counter64: 0
sysInterfaceStatPktsOut."1.3" = Counter64: 0
sysInterfaceStatPktsOut."1.4" = Counter64: 0
sysInterfaceStatPktsOut."1.5" = Counter64: 0
sysInterfaceStatPktsOut."1.6" = Counter64: 0
sysInterfaceStatPktsOut."1.7" = Counter64: 0
sysInterfaceStatPktsOut."1.8" = Counter64: 0
sysInterfaceStatPktsOut."2.1" = Counter64: 638707789
sysInterfaceStatPktsOut."2.2" = Counter64: 315266099
sysInterfaceStatPktsOut."mgmt" = Counter64: 316267064
sysInterfaceStatBytesOut."1.1" = Counter64: 0
sysInterfaceStatBytesOut."1.2" = Counter64: 0
sysInterfaceStatBytesOut."1.3" = Counter64: 0
sysInterfaceStatBytesOut."1.4" = Counter64: 0
sysInterfaceStatBytesOut."1.5" = Counter64: 0
sysInterfaceStatBytesOut."1.6" = Counter64: 0
sysInterfaceStatBytesOut."1.7" = Counter64: 0
sysInterfaceStatBytesOut."1.8" = Counter64: 0
sysInterfaceStatBytesOut."2.1" = Counter64: 461651628476
sysInterfaceStatBytesOut."2.2" = Counter64: 172002545859
sysInterfaceStatBytesOut."mgmt" = Counter64: 83258425569
sysInterfaceStatMcastIn."1.1" = Counter64: 0
sysInterfaceStatMcastIn."1.2" = Counter64: 0
sysInterfaceStatMcastIn."1.3" = Counter64: 0
sysInterfaceStatMcastIn."1.4" = Counter64: 0
sysInterfaceStatMcastIn."1.5" = Counter64: 0
sysInterfaceStatMcastIn."1.6" = Counter64: 0
sysInterfaceStatMcastIn."1.7" = Counter64: 0
sysInterfaceStatMcastIn."1.8" = Counter64: 0
sysInterfaceStatMcastIn."2.1" = Counter64: 453903
sysInterfaceStatMcastIn."2.2" = Counter64: 437413
sysInterfaceStatMcastIn."mgmt" = Counter64: 29089469
sysInterfaceStatMcastOut."1.1" = Counter64: 0
sysInterfaceStatMcastOut."1.2" = Counter64: 0
sysInterfaceStatMcastOut."1.3" = Counter64: 0
sysInterfaceStatMcastOut."1.4" = Counter64: 0
sysInterfaceStatMcastOut."1.5" = Counter64: 0
sysInterfaceStatMcastOut."1.6" = Counter64: 0
sysInterfaceStatMcastOut."1.7" = Counter64: 0
sysInterfaceStatMcastOut."1.8" = Counter64: 0
sysInterfaceStatMcastOut."2.1" = Counter64: 17297
sysInterfaceStatMcastOut."2.2" = Counter64: 17271
sysInterfaceStatMcastOut."mgmt" = Counter64: 48
sysInterfaceStatErrorsIn."1.1" = Counter64: 0
sysInterfaceStatErrorsIn."1.2" = Counter64: 0
sysInterfaceStatErrorsIn."1.3" = Counter64: 0
sysInterfaceStatErrorsIn."1.4" = Counter64: 0
sysInterfaceStatErrorsIn."1.5" = Counter64: 0
sysInterfaceStatErrorsIn."1.6" = Counter64: 0
sysInterfaceStatErrorsIn."1.7" = Counter64: 0
sysInterfaceStatErrorsIn."1.8" = Counter64: 0
sysInterfaceStatErrorsIn."2.1" = Counter64: 3610
sysInterfaceStatErrorsIn."2.2" = Counter64: 0
sysInterfaceStatErrorsIn."mgmt" = Counter64: 0
sysInterfaceStatErrorsOut."1.1" = Counter64: 0
sysInterfaceStatErrorsOut."1.2" = Counter64: 0
sysInterfaceStatErrorsOut."1.3" = Counter64: 0
sysInterfaceStatErrorsOut."1.4" = Counter64: 0
sysInterfaceStatErrorsOut."1.5" = Counter64: 0
sysInterfaceStatErrorsOut."1.6" = Counter64: 0
sysInterfaceStatErrorsOut."1.7" = Counter64: 0
sysInterfaceStatErrorsOut."1.8" = Counter64: 0
sysInterfaceStatErrorsOut."2.1" = Counter64: 0
sysInterfaceStatErrorsOut."2.2" = Counter64: 0
sysInterfaceStatErrorsOut."mgmt" = Counter64: 0
sysInterfaceStatDropsIn."1.1" = Counter64: 0
sysInterfaceStatDropsIn."1.2" = Counter64: 0
sysInterfaceStatDropsIn."1.3" = Counter64: 0
sysInterfaceStatDropsIn."1.4" = Counter64: 0
sysInterfaceStatDropsIn."1.5" = Counter64: 0
sysInterfaceStatDropsIn."1.6" = Counter64: 0
sysInterfaceStatDropsIn."1.7" = Counter64: 0
sysInterfaceStatDropsIn."1.8" = Counter64: 0
sysInterfaceStatDropsIn."2.1" = Counter64: 58
sysInterfaceStatDropsIn."2.2" = Counter64: 87
sysInterfaceStatDropsIn."mgmt" = Counter64: 0
sysInterfaceStatDropsOut."1.1" = Counter64: 0
sysInterfaceStatDropsOut."1.2" = Counter64: 0
sysInterfaceStatDropsOut."1.3" = Counter64: 0
sysInterfaceStatDropsOut."1.4" = Counter64: 0
sysInterfaceStatDropsOut."1.5" = Counter64: 0
sysInterfaceStatDropsOut."1.6" = Counter64: 0
sysInterfaceStatDropsOut."1.7" = Counter64: 0
sysInterfaceStatDropsOut."1.8" = Counter64: 0
sysInterfaceStatDropsOut."2.1" = Counter64: 0
sysInterfaceStatDropsOut."2.2" = Counter64: 0
sysInterfaceStatDropsOut."mgmt" = Counter64: 0
sysInterfaceStatCollisions."1.1" = Counter64: 0
sysInterfaceStatCollisions."1.2" = Counter64: 0
sysInterfaceStatCollisions."1.3" = Counter64: 0
sysInterfaceStatCollisions."1.4" = Counter64: 0
sysInterfaceStatCollisions."1.5" = Counter64: 0
sysInterfaceStatCollisions."1.6" = Counter64: 0
sysInterfaceStatCollisions."1.7" = Counter64: 0
sysInterfaceStatCollisions."1.8" = Counter64: 0
sysInterfaceStatCollisions."2.1" = Counter64: 0
sysInterfaceStatCollisions."2.2" = Counter64: 0
sysInterfaceStatCollisions."mgmt" = Counter64: 0
sysInterfaceStatQqIn."1.1" = Counter64: 0
sysInterfaceStatQqIn."1.2" = Counter64: 0
sysInterfaceStatQqIn."1.3" = Counter64: 0
sysInterfaceStatQqIn."1.4" = Counter64: 0
sysInterfaceStatQqIn."1.5" = Counter64: 0
sysInterfaceStatQqIn."1.6" = Counter64: 0
sysInterfaceStatQqIn."1.7" = Counter64: 0
sysInterfaceStatQqIn."1.8" = Counter64: 0
sysInterfaceStatQqIn."2.1" = Counter64: 0
sysInterfaceStatQqIn."2.2" = Counter64: 0
sysInterfaceStatQqIn."mgmt" = Counter64: 0
sysInterfaceStatQqOut."1.1" = Counter64: 0
sysInterfaceStatQqOut."1.2" = Counter64: 0
sysInterfaceStatQqOut."1.3" = Counter64: 0
sysInterfaceStatQqOut."1.4" = Counter64: 0
sysInterfaceStatQqOut."1.5" = Counter64: 0
sysInterfaceStatQqOut."1.6" = Counter64: 0
sysInterfaceStatQqOut."1.7" = Counter64: 0
sysInterfaceStatQqOut."1.8" = Counter64: 0
sysInterfaceStatQqOut."2.1" = Counter64: 0
sysInterfaceStatQqOut."2.2" = Counter64: 0
sysInterfaceStatQqOut."mgmt" = Counter64: 0
sysInterfaceStatPauseActive."1.1" = INTEGER: none(0)
sysInterfaceStatPauseActive."1.2" = INTEGER: none(0)
sysInterfaceStatPauseActive."1.3" = INTEGER: none(0)
sysInterfaceStatPauseActive."1.4" = INTEGER: none(0)
sysInterfaceStatPauseActive."1.5" = INTEGER: none(0)
sysInterfaceStatPauseActive."1.6" = INTEGER: none(0)
sysInterfaceStatPauseActive."1.7" = INTEGER: none(0)
sysInterfaceStatPauseActive."1.8" = INTEGER: none(0)
sysInterfaceStatPauseActive."2.1" = INTEGER: none(0)
sysInterfaceStatPauseActive."2.2" = INTEGER: none(0)
sysInterfaceStatPauseActive."mgmt" = INTEGER: none(0)
sysChassisFanSpeed
# snmpwalk -On -c public -v 2c 127.0.0.1 sysChassisFanSpeed
.1.3.6.1.4.1.3375.2.1.3.2.1.2.1.3.1 = Gauge32: 2906
.1.3.6.1.4.1.3375.2.1.3.2.1.2.1.3.2 = Gauge32: 2903
.1.3.6.1.4.1.3375.2.1.3.2.1.2.1.3.3 = Gauge32: 2905
.1.3.6.1.4.1.3375.2.1.3.2.1.2.1.3.4 = Gauge32: 2909
sysChassisFanStatus
# snmpwalk -Ons -c public -v 2c 127.0.0.1 sysChassisFanStatus
sysChassisFanStatus.1 = INTEGER: good(1)
sysChassisFanStatus.2 = INTEGER: good(1)
sysChassisFanStatus.3 = INTEGER: good(1)
sysChassisFanStatus.4 = INTEGER: good(1)
sysChassisTempTemperature
# snmpwalk -Ons -c public -v 2c 127.0.0.1 sysChassisTempTemperature
sysChassisTempTemperature.1 = INTEGER: 28
sysChassisTempTemperature.2 = INTEGER: 28
sysChassisTempTemperature.3 = INTEGER: 33
sysChassisTempTemperature.4 = INTEGER: 33
sysChassisTempTemperature.5 = INTEGER: 35
sysMultiHostCpuUsageRatio1m
# snmpwalk -Ons -c public -v 2c 127.0.0.1 sysMultiHostCpuUsageRatio1m
sysMultiHostCpuUsageRatio1m."0".1 = Gauge32: 21
sysMultiHostCpuUsageRatio1m."0".2 = Gauge32: 11
sysMultiHostCpuUsageRatio1m."0".3 = Gauge32: 20
sysMultiHostCpuUsageRatio1m."0".4 = Gauge32: 10
sysMultiHostCpuUsageRatio1m."0".5 = Gauge32: 20
sysMultiHostCpuUsageRatio1m."0".6 = Gauge32: 9
sysMultiHostCpuUsageRatio1m."0".7 = Gauge32: 21
sysMultiHostCpuUsageRatio1m."0".8 = Gauge32: 8
sysCpuSensorTemperature
# snmpwalk -Ons -c public -v 2c 127.0.0.1 sysCpuSensorTemperature
sysCpuSensorTemperature.0.1 = INTEGER: 40
sysChassisPowerSupply
# snmpwalk -Ons -c public -v 2c 127.0.0.1 sysChassisPowerSupply
sysChassisPowerSupplyNumber.0 = INTEGER: 2
sysChassisPowerSupplyIndex.1 = INTEGER: 1
sysChassisPowerSupplyIndex.2 = INTEGER: 2
sysChassisPowerSupplyStatus.1 = INTEGER: good(1)
sysChassisPowerSupplyStatus.2 = INTEGER: good(1)
sysHostDisk
# snmpwalk -Ons -c public -v 2c 127.0.0.1 sysHostDisk
sysHostDiskNumber.0 = INTEGER: 7
sysHostDiskPartition."/" = STRING: /
sysHostDiskPartition."/usr" = STRING: /usr
sysHostDiskPartition."/var" = STRING: /var
sysHostDiskPartition."/config" = STRING: /config
sysHostDiskPartition."/shared" = STRING: /shared
sysHostDiskPartition."/var/log" = STRING: /var/log
sysHostDiskPartition."/var/named/lib" = STRING: /var/named/lib
sysHostDiskBlockSize."/" = Gauge32: 1024
sysHostDiskBlockSize."/usr" = Gauge32: 4096
sysHostDiskBlockSize."/var" = Gauge32: 4096
sysHostDiskBlockSize."/config" = Gauge32: 4096
sysHostDiskBlockSize."/shared" = Gauge32: 4096
sysHostDiskBlockSize."/var/log" = Gauge32: 4096
sysHostDiskBlockSize."/var/named/lib" = Gauge32: 4096
sysHostDiskTotalBlocks."/" = Gauge32: 436342
sysHostDiskTotalBlocks."/usr" = Gauge32: 1329430
sysHostDiskTotalBlocks."/var" = Gauge32: 774084
sysHostDiskTotalBlocks."/config" = Gauge32: 817398
sysHostDiskTotalBlocks."/shared" = Gauge32: 7740927
sysHostDiskTotalBlocks."/var/log" = Gauge32: 1806206
sysHostDiskTotalBlocks."/var/named/lib" = Gauge32: 774084
sysHostDiskFreeBlocks."/" = Gauge32: 332153
sysHostDiskFreeBlocks."/usr" = Gauge32: 175742
sysHostDiskFreeBlocks."/var" = Gauge32: 524514
sysHostDiskFreeBlocks."/config" = Gauge32: 685184
sysHostDiskFreeBlocks."/shared" = Gauge32: 5838338
sysHostDiskFreeBlocks."/var/log" = Gauge32: 1655811
sysHostDiskFreeBlocks."/var/named/lib" = Gauge32: 524514
sysHostDiskTotalNodes."/" = Gauge32: 112640
sysHostDiskTotalNodes."/usr" = Gauge32: 338016
sysHostDiskTotalNodes."/var" = Gauge32: 196608
sysHostDiskTotalNodes."/config" = Gauge32: 208000
sysHostDiskTotalNodes."/shared" = Gauge32: 3932160
sysHostDiskTotalNodes."/var/log" = Gauge32: 917504
sysHostDiskTotalNodes."/var/named/lib" = Gauge32: 196608
sysHostDiskFreeNodes."/" = Gauge32: 108477
sysHostDiskFreeNodes."/usr" = Gauge32: 255550
sysHostDiskFreeNodes."/var" = Gauge32: 185620
sysHostDiskFreeNodes."/config" = Gauge32: 207166
sysHostDiskFreeNodes."/shared" = Gauge32: 3931572
sysHostDiskFreeNodes."/var/log" = Gauge32: 917120
sysHostDiskFreeNodes."/var/named/lib" = Gauge32: 185620
sysSoftwareStatus
# snmpwalk -Ons -c public -v 2c 127.0.0.1 sysSoftwareStatus
sysSwStatusNumber.0 = INTEGER: 3
sysSwStatusSlotId.0."HD1.1" = INTEGER: 0
sysSwStatusSlotId.0."HD1.2" = INTEGER: 0
sysSwStatusSlotId.0."HD1.3" = INTEGER: 0
sysSwStatusVolume.0."HD1.1" = STRING: HD1.1
sysSwStatusVolume.0."HD1.2" = STRING: HD1.2
sysSwStatusVolume.0."HD1.3" = STRING: HD1.3
sysSwStatusProduct.0."HD1.1" = STRING: BIG-IP
sysSwStatusProduct.0."HD1.2" = STRING: BIG-IP
sysSwStatusProduct.0."HD1.3" = STRING: BIG-IP
sysSwStatusVersion.0."HD1.1" = STRING: 13.1.3
sysSwStatusVersion.0."HD1.2" = STRING: 15.1.0.2
sysSwStatusVersion.0."HD1.3" = STRING: 15.1.0.2
sysSwStatusBuild.0."HD1.1" = STRING: 0.0.6
sysSwStatusBuild.0."HD1.2" = STRING: 0.0.9
sysSwStatusBuild.0."HD1.3" = STRING: 0.9.9
sysSwStatusActive.0."HD1.1" = INTEGER: false(0)
sysSwStatusActive.0."HD1.2" = INTEGER: false(0)
sysSwStatusActive.0."HD1.3" = INTEGER: true(1)
Local Traffic Manager (LTM)
Check F5-BIGIP-LOCAL-MIB in oidview.com
ltmPoolMemberNodeName
# snmpwalk -Ons -c public -v 2c 127.0.0.1 ltmPoolMemberNodeName
ltmPoolMemberNodeName."/Common/pool_app1.domain.ch_80"."/Common/host1.domain.ch".80 = STRING: /Common/host1.domain.ch
ltmPoolMemberNodeName."/Common/pool_app1.domain.ch_80"."/Common/host2.domain.ch".80 = STRING: /Common/host2.domain.ch
ltmPoolMemberNodeName."/Common/pool_app2.domain.ch_80"."/Common/host3.domain.ch".80 = STRING: /Common/host3.domain.ch
ltmPoolMemberNodeName."/Common/pool_app2.domain.ch_80"."/Common/host4.domain.ch".80 = STRING: /Common/host4.domain.ch
ltmPoolMemberNodeName."/Common/pool_app3.domain.ch_80"."/Common/host5.domain.ch".80 = STRING: /Common/host5.domain.ch
ltmPoolMemberNodeName."/Common/pool_app3.domain.ch_80"."/Common/host6.domain.ch".80 = STRING: /Common/host6.domain.ch
...
ltmNodeAddrStatServerCurConns

# snmpwalk -Ons -c public -v 2c 127.0.0.1 ltmNodeAddrStatServerCurConns
ltmNodeAddrStatServerCurConns."/Common/host1.domain.ch" = Gauge32: 0
ltmNodeAddrStatServerCurConns."/Common/host2.domain.ch" = Gauge32: 5515
ltmNodeAddrStatServerCurConns."/Common/host3.domain.ch" = Gauge32: 300
ltmNodeAddrStatServerCurConns."/Common/host4.domain.ch" = Gauge32: 300
ltmNodeAddrStatServerCurConns."/Common/host5.domain.ch" = Gauge32: 4
...
ltmPoolMemberMonitorStatus
# snmpwalk -Ons -c public -v 2c 127.0.0.1 ltmPoolMemberMonitorStatus
ltmPoolMemberMonitorStatus."/Common/pool_app1.domain.ch_80"."/Common/host1.domain.ch".80 = INTEGER: up(4)
ltmPoolMemberMonitorStatus."/Common/pool_app1.domain.ch_80"."/Common/host2.domain.ch".80 = INTEGER: up(4)
ltmPoolMemberMonitorStatus."/Common/pool_app2.domain.ch_80"."/Common/host3.domain.ch".80 = INTEGER: up(4)
ltmPoolMemberMonitorStatus."/Common/pool_app2.domain.ch_80"."/Common/host4.domain.ch".80 = INTEGER: up(4)
ltmPoolMemberMonitorStatus."/Common/pool_app3.domain.ch_pop3"."/Common/host5.domain.ch".110 = INTEGER: addrDown(18)
...
Access Policy Manager (APM)
Check F5-BIGIP-APM-MIB in oidview.com
apmPaStatCurrentActiveSessions
# snmpwalk -Ons -c public -v 2c 127.0.0.1 apmPaStatCurrentActiveSessions
apmPaStatCurrentActiveSessions."access"."_listener" = Counter64: 0
apmPaStatCurrentActiveSessions."_tmm_apm_acl"."_tmm_apm_fwd_vip_http" = Counter64: 0
apmPaStatCurrentActiveSessions."_tmm_apm_acl"."_tmm_apm_fwd_vip_http_ipv6" = Counter64: 0
apmPaStatCurrentActiveSessions."/Common/access"."_listener" = Counter64: 0
apmPaStatCurrentActiveSessions."/Common/webtop_test"."_listener" = Counter64: 5
apmPaStatCurrentActiveSessions."/Common/webtop_test"."/Common/webtop_test_vs" = Counter64: 5
...
apmPaStatCurrentPendingSessions
# snmpwalk -Ons -c public -v 2c 127.0.0.1 apmPaStatCurrentPendingSessions
apmPaStatCurrentPendingSessions."access"."_listener" = Counter64: 0
apmPaStatCurrentPendingSessions."_tmm_apm_acl"."_tmm_apm_fwd_vip_http" = Counter64: 0
apmPaStatCurrentPendingSessions."_tmm_apm_acl"."_tmm_apm_fwd_vip_http_ipv6" = Counter64: 0
apmPaStatCurrentPendingSessions."/Common/access"."_listener" = Counter64: 0
apmPaStatCurrentPendingSessions."/Common/webtop_test"."_listener" = Counter64: 5
apmPaStatCurrentPendingSessions."/Common/webtop_test"."/Common/webtop_test_vs" = Counter64: 5
...
apmPaStatCurrentCompletedSessions
# snmpwalk -Ons -c public -v 2c 127.0.0.1 apmPaStatCurrentCompletedSessions
apmPaStatCurrentCompletedSessions."access"."_listener" = Counter64: 0
apmPaStatCurrentCompletedSessions."_tmm_apm_acl"."_tmm_apm_fwd_vip_http" = Counter64: 0
apmPaStatCurrentCompletedSessions."_tmm_apm_acl"."_tmm_apm_fwd_vip_http_ipv6" = Counter64: 0
apmPaStatCurrentCompletedSessions."/Common/access"."_listener" = Counter64: 0
apmPaStatCurrentCompletedSessions."/Common/webtop_test"."_listener" = Counter64: 5
apmPaStatCurrentCompletedSessions."/Common/webtop_test"."/Common/webtop_test_vs" = Counter64: 5
...
Links
- K4026: BIG-IP platforms support SNMP monitoring for chassis fan speed, chassis temperature, CPU temperature, and power supply status
- K14399: Determining the failover status of a BIG-IP system using SNMP (11.2.0 and later)
- K13322: Overview of BIG-IP MIB files
F5 Programming
F5 Programming Links
Generic F5 Links
- SomoIT F5 Blog
- APM Cookbook: Modify LDAP Attribute Values using iRulesLX
- BIG-IP Configuration Visualizer
- bigip.conf parser
Command Injection in F5 iRules
ASM Deployment

API Security
Manual Chapter v13.1.0: Implementing Web Services Security
Manual Chapter v13.1.0: Creating Parent and Child Security Policies
Fundamental, Enhanced, Comprehensive
Fundamental = Grundlegend
Enhanced = Verbessert
Comprehensive = Umfassend
The following is from the v12 UI (Security – Application Security : Policy Building : Learning and Blocking Settings, Policy Type)
| Fundamental |
Enhanced |
Comprehensive |
|---|---|---|
|
|
|
https://devcentral.f5.com/questions/asm-confusion-about-wildcard-selective-all-entities-49185
-> “Add All Entities Creates a comprehensive whitelist policy that includes all web site entities”
Learning Schemes to build a policy
- Never (wildcard only), when false positive occur the system will suggest to relax the settings of the wildcard entity.
- Selective is that only entity (Parameter name/value, URL etc) that exceeds the Wildcard setting would generate learning suggestion and those learning suggestion are accepted by administrator entity will get included in security policy.
- Selective mode offers intermediate protection between Never (Wildcard Only) and Add All Entities.
- Selective mode is suitable for applications containing entities which use similar or identical attributes.
- Ideally, when you know the policy is mature, you can remove the wildcard
- Add All Entities, you will see a suggestion to add an entity by name
BIG-IP ASM Policy Builder updates
BIG-IP 13.0
Updates to Policy Builder in BIG-IP 13.0 include the following enhancements:
- Compact mode is an entity learning mode designed to effectively manage high traffic loads and increase policy security.
- Compact mode reduces the amount of learning suggestions, enabling a policy to converge more quickly, and automatically adds disallowed file types.
- Compact mode will never removing the wildcard.
- Server Technologies is an option that customizes policies to an application. This option enables Policy Builder to identify the back-end technologies used by an application and add the relevant signatures to the policy.
-
Client Reputation is a technique that improves learning suggestions by using behavioral analysis to assign a reputation score to a source IP or device ID. Policy Builder ignores sources classified as malicious and speeds learning on sources classified as benign.
BIG-IP 12.0
There are several updates to Policy Builder in BIG-IP 12.0, including the following:
-
Staging, enforcement, and learning suggestions can be configured manually or by the BIG-IP ASM system.
-
Security checks Learn, Alarm, and Block are now system-wide settings integrated with Policy Builder.
-
An improved learning suggestions mechanism handles requests, with or without violations, for manual and automated policy building.
Links
- Using Rapid Deployment
- BIG-IP Application Security Manager Operations Guide
- Use ASM for Block Page Example
- DevCentral: F5 ASM deployment for production traffic in transparent mode
- DevCentral: Lightboard Lessons: BIG-IP ASM Policy Buildin
- DevCentral: Different Blocking pages for different violation?
F5 REST-API (iControlREST)
iControlREST Home
Find the documentation about the F5 REST-API here:
https://clouddocs.f5.com/api/icontrol-rest/
Examples
GTM
Get GTM Pool fallbackIp
curl -sku admin:<password> https://<f5-bigip>/mgmt/tm/gtm/pool/a\
| jq '.items[] | { name: .name, ip: .fallbackIp }'F5 LTM Config Merge Procedure
Description
To Merge an LTM config from a F5 to another F5 you need to split the bigip.conf file into seperate config files which you need then to import on the destination F5.
Import the config parts with copy-paste into the terminal and with the following tmsh command:
load sys config from-terminal mergeIt is recommended to check the config first with verify then check for any resulting errors:
load sys config from-terminal merge verifyOrder of import
Importing the F5 config needs a specific order which is recommended. I did this many times and never had a problem migrating a config from one F5 to another.
- Import Certificate archive of the source F5
- ltm monitor
Check for monitor passwords if used
For external monitors check if run scripts need to be converted. Copy the files from external monitors first if needed.
- ltm node
- ltm data-group
- ltm pool
- ltm rule
Check if iRules already exists on the destination F5
- ltm persistence
If ASM Policies are used, they need to be exported and imported on the new system. ASM Policies are configured in LTM Policies.
- ltm policy
Check for invalid url! Since v12 for a location string you need to prepend it with "tcl:"
- ltm auth_ssl-cc-ldap
Check for passwords in the config
- ltm auth profile
If 'ltm profile client-ssl' need to be migrated, clientssl files need to export/import first
- ltm profile
- sys ifiles
Check if ifiles already exists on the destination F5.
Maybe you don't need to migrate this since it is already migrated with the ssl archive above
- sys file external monitor
- ltm ifile
Check if ifile already exists on the destination F5
- ltm snat
- ltm snat-translation
- ltm snatpool
If you also migrating APM config you need to export-import now the APM access policies from the source to the destination F5
-
ltm virtual
For migration you can set the new config to "dummy" ip-addresses. So is would be possible to "migrate" one VS by the other.
Only change the real ip-address on the source to a "dummy" ip-address and set the real ip-address on the destination F5.
Migration done...
Troubleshooting
F5 APM: Convert attribute values
Status
The problem with APM LDAP auth is that LDAP-attributes with values of ASCII chars can be used in further scripts without problems.
If you have some UTF8 characters in the value the F5 APM will convert the string to a HEX-string:
Aus dem F5 Manual: https://support.f5.com/kb/en-us/products/big-ip_apm/manuals/product/apm-authentication-single-sign-on-11-5-0/5.html
About how APM handles binary values in LDAP attributes
For LDAP, Access Policy Manager (APM) converts an attribute value to hex only if the value contains unprintable characters.
f the session variable contains several values, and one or more of those values is unprintable, then APM converts only those particular values to hex.
Case 1:
Handling of attributes with single value:
9302eb80.session.ldap.last.attr.objectGUID 34 / 0xfef232d3039be9409a72bfc60bf2a6d0Case 2:
Handling of attributes with multiple values (mix of binary and non-binary values):
29302eb80.session.ldap.last.attr.memberOf 251 | / CN=printable group,OU=groups,OU=someco,DC=smith, \
/ DC=labt,DC=fp,DC=somelabnet,DC=com | / 0x434e3d756e7072696e7461626c6520c2bdc2a12067726f75702c4f553d67726f7570732c4f553d66352c \
/ 44433d73686572776f6f642c44433d6c6162742c44433d66702c44433d66356e65742c44433d636f6d |
Possible solution
Devcentral: https://devcentral.f5.com/questions/looking-for-irule-to-convert-non-ascii-character-to-ascii
In 12.0.0
ID 399693:
It is now possible to use the -decode option for mcget command of a branch rule to decode a session variable before using it.
When you create an agent and add a branch rule, the default value of the rule contains an mcget command to fetch the session variable. By default, the session variable is HEX encoded if it contains non-ASCII characters.
You need to modify the command in advanced mode and insert the -decode option for mcget command, for example:
expr { [mcget -decode {session.ad.last.attr.memberOf}] contains "non-ASCII-characters" }
VPN Client Troubleshooting
Problem
To troubleshoot for example an error message like "Machine Cert Auth Error - unable to get local issuer certificate" you need to get log from the VPN Client.
Client Troubleshooting Utility (CTU)
The f5wininfo.exe utility can be used on the client to do a very good troubleshooting.
You will get the utility from your F5 APM on URL:
https://<fqdn or ip>/public/download/f5wininfo.exe
With f5wininfo.exe you're able to export a diagnostic report of the client as a html file with all the very detail information you need.
Example Output

Links
For more informations about the troubleshooting on the client check the following links:
- K12444: Overview of the Client Troubleshooting Utility for Windows
- K00819308: Gathering F5 VPN client logs
- K32311645: BIG-IP Edge Client operations guide | Chapter 7: Troubleshooting
F5 Big-IP Advanced Troubleshooting
I work with F5 since many years and I always need some advanced troubleshooting tools which I documented here a little bit.
CLI Commands
Show pool members monitoring status
tmsh show ltm pool all members field-fmt | grep -P "(ltm\ pool|active-member-cnt|addr|monitor-status)"Count pool members with monitoring status "monitor-status checking"
tmsh show ltm pool all members field-fmt | grep "monitor-status\ checking" | wc -lShow Health Monitor status
Example with ICMP health monitor:
tmsh show ltm monitor icmp icmp

Answer:
Destination:  1.7.3.55:0
   State time:   up for 527hrs:54mins:45sec
  |   Last error:   N/A @2019.11.12 10:58:51

  Destination:  1.7.3.56:0
   State time:   up for 527hrs:54mins:45sec
  |   Last error:   N/A @2019.11.12 10:58:51

  Destination:  1.7.3.131:0
   State time:   down for 527hrs:54mins:45sec
  |   Last error:   No successful responses received before deadline. @2019.11.12 10:58:51

  Destination:  1.7.3.139:0
   State time:   down for 527hrs:54mins:45sec
  |   Last error:   No successful responses received before deadline. @2019.11.12 10:58:51
K53851362 - Displaying and deleting connection table entries from the command line
The BIG-IP connection table contains information about all the sessions that are currently established on BIG-IP system. You can display and delete the contents of the BIG-IP connection table from the command line using the tmsh connection command.
Important: On systems with a large number of connections, executing the following commands with a large output may result in excessive output causing device instability. It is recommended you limit the output to specific IP address and/or port combination as demonstrated in the examples below.
Display Connection Table Entries:
- To display the BIG-IP connection table entries for a particular virtual server, use the following tmsh command syntax:
For example, to display the BIG-IP connection table entries for 10.10.2.2:443 virtual server, you would type the following command:tmsh show /sys connection cs-server-addr <vs_ip> cs-server-port <vs_port>tmsh show /sys connection cs-server-addr 10.10.2.2 cs-server-port 443 - To display the BIG-IP connection table entries for a particular client IP address, use the following tmsh command syntax:
For example, to display the BIG-IP connection table entries for 10.10.20.2 client IP address, you would type the following commnad:tmsh show /sys connection cs-client-addr <client_ip>tmsh show /sys connection cs-client-addr 10.10.20.2 - To display the BIG-IP connection table entries for a particular pool member, use the following tmsh command syntax:
For example, to display the BIG-IP connection table entries for 192.168.10.2:80 pool member, you would type the following command:tmsh show /sys connection ss-server-addr <pool_member_ip> ss-server-port <pool_member_port>tmsh show /sys connection ss-server-addr 192.168.10.2 ss-server-port 80 - To display additional information about particular connection such as Idle timeout, number of packets sent etc, use the following tmsh command syntax:
For example, to display specific details of connection established between 10.10.20.2:51435 (client) and 10.10.2.2:443 (virtual server), you would type the following command:tmsh show /sys connection cs-client-addr <client_ip> cs-client-port <client_port> cs-server-addr <vs_ip> cs-server-port <vs_port> all-propertiestmsh show /sys connection cs-client-addr 10.10.20.2 cs-client-port 51435 cs-server-addr 10.10.2.2 cs-server-port 443 all-properties
Delete the connection table entries:
- To delete the BIG-IP connection table entries for a particular client IP and virtual server, use the following tmsh command syntax:
For example, to delete the BIG-IP connection table entries for 10.10.20.2 client IP address and 10.10.2.2:443 virtual server, you would type the following command:tmsh delete /sys connection cs-client-addr <client_ip> cs-server-addr <vs_ip> cs-server-port <vs_port>tmsh delete /sys connection cs-client-addr 10.10.20.2 cs-server-addr 10.10.2.2 cs-server-port 443
F5 Support Solution Link
K53851362: Displaying and deleting BIG-IP connection table entries from the command line
K7318: Overview of the bigtop utility
- Current time
- Network activity in bits, bytes, packets, or requests
- Nodes available for virtual servers
- Current state of nodes
Example:
bigtop -n
F5 Support Solution Link
K7318: Overview of the bigtop utility
Send Logfiles to F5 Support and compress them
If you need to send all logfiles to F5 Support you need tom compress them all.
You can do this like this as root user:
- Log in to the command line.
- Create a tar archive in the /var/tmp directory that contains all the files in the /var/log directory, by typing the following command:
tar zcvf /var/tmp/$HOSTNAME-logs.tar.gz /var/log/* - This will generate a file in /var/tmp with the name of the device followed by the -logs.tar.gz suffix. You need to transfer this file out of the system using an utility like scp/WinSCP
Links & Tools
F5 Troubleshooting Links
BigIP Generic
- K13845: Overview of supported BIG-IP upgrade paths and an upgrade planning reference
- K13946: Troubleshooting ConfigSync and device service clustering issues (11.x - 13.x)
- K82540512: Overview of the UCS archive 'platform-migrate' option
- K95002127: Troubleshooting BIG-IP failover events (Also Log Queries to track failover events)
- K41550738: Viewing BIG-IP log files using the iControl REST API
- K41458656: Reusing a BIG-IP VE license on a different BIG-IP VE system
- K35281771: How to enable LACP debugging for VIPIRON platforms
- K48019012: Unable to perform a config sync after renaming virtual server name using 'tmsh mv'
- K19545335: Overview of TMM fast flow forwarding
- K51048177: Cannot authenticate onto BIG-IP instance on the Azure
- K22885182: sftp access to the BIG-IP system is now disabled for users with tmsh-shell access
LTM
- K02479505: Resetting malicious HTTP and TCP traffic using local traffic policies
- K7595: Overview of IP forwarding virtual servers
- K46250932: Wildcard virtual addresses may cause IP conflicts when ARP is enabled
- K13510538: VIP pointing traffic to 2 priority groups when only 1 active
- K13502: Configuring MAC masquerade (11.x - 14.x)
- K00445006: Unable to download PDF files larger than 50KB
- K01533702: Newly created HTTPS monitor fails and marks pool member down
- K44310518: Disabled Virtual Server intercepts traffic by matching and dropping it
APM
- APM - Sanitize special characters in AD groups names
- K14819: Troubleshooting client certificate authentication
- K67310544: Overview of the SAML Single Logout (SLO) URLs
- K70726133: Overview of BIG-IP APM SAML SLO
ASM
- K07359270: Succeeding with application security
- K79575295: Creating a security policy automatically (13.x)
- K71159058: Creating a security policy automatically (12.x)
- K11914: Updating a BIG-IP ASM Security Policy when your website changes
- K12885: Working with BIG-IP ASM attack signatures
- K11717335: BIG-IP ASM parent and child (layered) security policies
- K6335: Overview of encoding language settings for the BIG-IP ASM system
- K54900446: Configuring BIG-IP ASM system resource alerts using tmsh
F5 TLS/SSL
- Cipher Rules And Groups in BIG-IP v13
- Cipher Suite Practices and Pitfalls
- Security Sidebar: Improving Your SSL Labs Test Grade
DNS
AskF5 Knowledge Documents
- K6793: OIDs polled by BIG-IP DNS for third-party server products
- K7717: BIG-IP DNS and Link Controller support for third-party SSL device certificates
- K13690: Troubleshooting BIG-IP DNS synchronization and iQuery connections (11.x - 13.x)
- K13412: Overview of BIG-IP DNS Topology records (11.x - 14.x)